Categories
Linux

Fix portainer-agent restart loop

For I while I’ve had two Docker hosts on my home network, one with Portainer installed and the other one with portainer-agent, to be able to have a single webinterface to manage both.

Portainer Logo

The one hosting Portainer has always had watchtower installed, in order to automate the upgrade of all containers, the second one did not. Once I realized it, I setup watchtower on it as well, and that’s when issues begun.

The issue

portainer-agent would enter a restart-loop, filling the logs with entries such as:

2021/10/31 07:53:21 [INFO] [main] [message: Agent running on Docker platform]
2021/10/31 07:53:21 [ERROR] [main,docker] [message: Unable to retrieve local agent IP address] [error: Error: No such container: 6d3437033dce]

The weird thing is that it was mentioning container 6d3437033dce, while portainer-agent was running as 9bf8b8a94d03.

I suspected it was due to something watchtower was doing when recreating containers after pulling the latest version.

A few searches later, I ended up finding this GitHub issue for portainer-agent, where jackman815 found that the issue was related to the way watchtower assigns the same hostname to the new containers.

I found the problem is about the watchtower, it clones the container configs included hostname when upgrading the container.

When upgrade/re-create the container, by default the docker daemon will assign a new hostname to the container and update internal dns, but the watchtower won’t update the container hostname after the container upgrade so the agent will try to look up the old hostname and it would be getting nxdomain result by docker internal dns.

The solution

As suggested in that issue, the solution is assigning a static hostname to the portainer-agent container.

To do so, stop and delete the old container, then re-create it with the --hostname option.

docker stop portainer_agent
docker rm portainer_agent
docker run -d -p 9001:9001 --name portainer_agent --hostname portainer_agent --restart=always -v /var/run/docker.sock:/var/run/docker.sock -v /var/lib/docker/volumes:/var/lib/docker/volumes portainer/agent:latest

Of course you’ll have to adjust the container name/hostname to match your setup.

Categories
Linux

GRUB: unknown filesystem on ZFS-based Proxmox

Error: unknown filesystem.
grub rescue>

This was the nice error that greeted me when I tried to (re)boot my Proxmox server.
What unknown filesystem? The server was still supposed to boot from the same ZFS disk it always booted from.

TL;DR it was due to the large_dnode getting enabled on a dataset I had manually created. GRUB does not support that feature. Create a new dataset with that feature explicitly disabled, move the data to it, delete the original and rename the new one. Done.

Some background

Being space-constrained in my apartment, my Proxmox server is actually my everything server. It is my virtualization server, my router (it runs pfSense in a VM) and my NAS (it runs Samba in an LXC container).

For NAS duties, I decided a while back to create a dedicated dataset rpool/nas, which I then mounted in the Samba container. Without much thinking, I just ran a simple:

zfs create rpool/nas

Due to ZFS defaults, it had the feature dnodesize set to auto. It was never an issue, until the other day.

What happened

Some file must have triggered a non-legacy (512 bytes) dnode size in the dataset, which meant that GRUB could no longer read the drive.

I came to that conclusion by installing Proxmox in a VM on my Mac (with an ext4 boot drive, to avoid having to rename the pool), and attaching the server’s SSD through a SATA-USB adapter.

I changed the mountpoint of my server’s boot partition from / to /recovery, mounted /dev /sys and /proc in there and then chrooted into /recovery:

zfs set mountpoint=/recovery rpool/ROOT/pve-1
mount --rbind /dev /recovery/dev
mount --rbind /sys /recovery/sys
mount -t proc /proc /recovery/proc
chroot /recovery

I ran grub-probe -vvvv / to get some insight on why GRUB was failing and one line was interesting:

grub-core / fs / zfs / zfs.c: 2112: zap: name = org.zfsonlinux: large_dnode, value = 1, cd = 0

I read a bit online and I found out about the dnodesize thing. I usually like to link back to all the places that were useful to find a solution to any problem I blog about, but this time it was just too difficult to keep track of everything, except for this discussion on the german Proxmox forums.

The solution

I ran zfs get -r dnodesize rpool to get a sense of what were the different dnodesize values for all the datasets in the pool. They were all set to legacy, except for my rpool/nas dataset.
So I made a new dataset for my NAS data with dnodesize explicitly set to legacy, then I rsync’d everything from the old dataset into the new one, destroyed the old dataset and renamed the new one.

zfs create -o dnodesize=legacy rpool/nas2
rsync -av --progress /rpool/nas/ /rpool/nas2/
zfs destroy rpool/nas
zfs rename rpool/nas2 rpool/nas

Last step: moving back the mountpoint for `rpool/ROOT/pve-1`:

zfs set mountpoint=/rpool/ROOT/pve-1

And then I moved the SSD back into my server.

That’s it. It just took an afternoon of cursing.

Categories
Linux

Moving Proxmox ZFS boot drive to a new disk

When I assembled my little Proxmox home server, mainly used for pfSense, Home Assistant, Nextcloud and a few other apps, I underestimated the amount of storage I needed. I went with a cheap 120 GB SSD, but it was pretty much always full. I then found a deal on a 960 GB Kingston A400 SSD, so I got it.

My Kettop Mi3865L6 runs Proxmox on ZFS

The thing is I didn’t really want to go through a complete reinstall of Proxmox, restore of my VMs/CTs and reinstallation of Zabbix Agent on the host itself. Thankfully, my whole drive is ZFS formatted, so I have access to the great zfs send and zfs receive commands to move stuff around.

The steps

  1. Connect the SSD with a USB-SATA adapter to a Virtual Machine running on my Mac, and install Proxmox on it. This takes care of the GRUB bootloader.
  2. On the main Proxmox install, shutdown all CTs and VMs, and take a snapshot
  3. Connect the drive to Proxmox and import the pool with a different name
  4. ZFS send/receive the snapshot (recursively) to the new pool
  5. Export the pool
  6. Shutdown Proxmox and swap the drives
  7. Power on Proxmox, fix the pool name, reboot
  8. Fix the bootloader and initial ramdisk
  9. Profit (?)

1. Proxmox install on the new SSD

So the first step is to install Proxmox on the new SSD, and the easiest thing I could think was to use a simple USB3 to SATA adapter to connect it to my Mac, and then pass it to a VM in Parallels with the Proxmox ISO mounted. I then proceded with a regular install, choosing ZFS as the SSD’s filesystem. I could have done it all on a VM on the Proxmox server, but I didn’t bother.

2. Snapshot the old drive

Then I moved to the Proxmox server, shut down every VM and every CT, and took a recursive snapshot of the main pool (rpool is the default pool name on Proxmox):

sudo zfs snapshot -r rpool@newSSD

3. Connect the new SSD to Proxmox

After shutting down the VM I used to install Proxmox on the new SSD, I moved the USB3-SATA adapter to the Proxmox server.

First I needed to import the pool with a new name (rpoolUSB), since of course rpool was already taken.

sudo zpool import -d /dev
sudo zpool import [ID-OF-THE-POOL-ON-THE-NEW-SSD] rpoolUSB

4. Clone the old SSD onto the NEW one

Having just taken the snapshot on the old drive, It was just a metter of a ZFS send/receive, with the -F to overwrite the pool. This operation left the bootloader intact, which is great.

 sudo zfs send -R rpool@newSSD | sudo zfs recv -F rpoolUSB

5. Export the new pool

sudo zpool export rpoolUSB

6. Shutdown Proxmox and swap the drives

Connect a display to your Proxmox server if you don’t have one, or connect through KVM if your server has IPMI capabilities.

7. Fix the pool name

Remember how we renamed the pool to rpoolUSB in step 3? Proxmox doesn’t like that. Or rather, it doesn’t know about that. So the boot process with fail leaving you at a Busybox shell. Just import the pool giving it the usual rpool name and exit.

zpool import -d /dev
zpool import rpoolUSB rpool
exit

8. Fix the bootloader and initial ramdisk

The boot process now works fine, but it complains about some missing things. What’s needed is a fix of the initial ramdisk and possibly of the GRUB bootloader, I did both just to be on the safe side.

sudo update-grub2
sudo update-initramfs -u -k all

9. Profit

Let me know if you actually profited from this. I think you owe me 1% of your profits 😁

Categories
Linux

IPv6 route keeps getting re-added on Linux

One of my Raspberry Pis is connected to a VLAN through a cheap Netgear switch, and on that VLAN there is a /24 IPv4 network and a /64 IPv6 network.
On my regular (untagged) LAN, different IPv4 and IPv6 networks are used.

I noticed that somehow the Pi kept getting a route for the LAN /64 through its ethernet interface, without going through the router. That is not supposed to happen. As soon as I deleted the route (sudo ip route del IPv6_NET/64), it was re-added. This prevented any of the two subnets to talk to each other through the router, because the Pi did not send the traffic to the router, but tried to send it as if the other host were on the same network segment.

Then, suddenly, I remembered that I had to restart that stupid switch because I had to move its power brick to a different outlet: somehow while booting it ignored all VLAN configuration, so for a few seconds the Pi was connected to the main VLAN, got the route advertisment whiche for some reason dhcpcd kept hanging on and dutifully re-adding every time I deleted it.

The solution was easy: sudo systemctl restart dhcpcd

Categories
FreeBSD Linux Mac

BASH: Capturing both the output and the exit code of a process

Of course I found an answer to this in a collection of Stack Overflow questions, but to make things easier for anybody who might stumble into this post (and mainly for Future Me), here’s the answer.

Seriously, don’t do this.

Basically I have a command that sometimes produces an error, but usually just re-running it produces the correct output. When it encounters an error, it dutifully sets its error code to something other than 0 (success). But how to I capture both the command’s output and its exit code? This way.

output=$(myCommandWhichSometimesDoesntWork)
exit_code=$? # This HAS to be exeuted right after the command above

So I made a little wrapper script that repeatedly calls the first one until it gets an answer, with a set maximum number of retries to avoid infinite loops.

#!/bin/bash
retries=0
max_retries=10 # Change this appropriately
 
# The "2> /dev/null" silences stderr redirecting it to /dev/null
# The command must be first executed outside of the while loop:
# bash does not have a do...while construct
output=$(myCommandWhichSometimesDoesntWork 2> /dev/null)
while [[ $? -gt 0 ]]
do
        ((retries++))
        if [[ retries -gt max_retries ]]
        then
                exit 1
        fi
 
        output=$(myCommandWhichSometimesDoesntWork 2> /dev/null)
done
 
echo $output
Categories
FreeBSD Linux

Improve FreeNAS NFS performance when used with Proxmox

TL;DR: zfs set sync=disabled your/proxmox/dataset

Lately I’ve been playing around with Proxmox installed on an Intel NUC (the cleverly named NUC6CAYH, to be precise), and I must say it is really, really, cool.

I usually store my containers and VMs on the local 180 GB SSD that used to be in my old MacBook Pro, since it’s reasonably fast and it works well, but I wanted to experiment with NFS-backed storage off my FreeNAS box (4x4TB WD Reds in RAIDZ1, 16 GBs of RAM, an i5–3330 processor).

Frankly, I was pretty unsatisfied with the performance I was getting. Everything felt pretty slow, especially compared to the internal SSD and, surprisingly, to storing the same data on a little WD MyCloud (yes, the one with the handy built-in backdoor).

My very unscientific test was creating a fresh container based on Ubuntu 16.04, and upgrading the stock packages that came with it. As of today, it meant installing around 95 MB’s worth of packages, and a fair bit of I/O to get everything installed.

The task was completed in around 1’30″ with the container on the internal SSD, 2’10″ on the WD MyCloud, and an embarassing 7’15″ on the FreeNAS box.

After a bit of googling, I came to an easy solution: set the sync property of the ZFS dataset used by Proxmox to disabled (it is set to standard by default).

The complete command is zfs set sync=disabled your/proxmox/dataset (run that on FreeNAS as root or using sudo).

To be honest, I don’t really know the data-integrity implications of this flag: both machines and the switch between them are protected from power failures by two UPSs, so that shouldn’t be much of an issue.

Anyway, just changing that little flag signlificantly reduced the time required to complete my “benchmark”, bringing it down to around 1’40″, very close to Proxmox’s internal SSD. Again, at the moment I don’t really need to run VMs/CTs off the FreeNAS storage, but it is good to know that it is possible to achieve much faster performance with this little tweak.

Categories
Linux

Blocking access to DD-WRT’s web interface from guest network

Even though I’ve shifted all the routing functionality of my LAN to the excellent pfSense (and specifically to a PC Engines alix2d2, for the time being), DD-WRT still plays a role in my network, since it powers a couple of my access points.

ddwrt

One of its key features that I rely on is the ability to make two or more SSIDs available, bridging the wireless networks to different VLANs in order to separate them. I have a couple of them at the moment, but the main “secondary” network is the guest one.

On my guest network, I want to prevent any access to DD-WRT (such as the web interface, SSH management, and so on). AFAIK, there’s no graphical way to do so in the admin panel, so I resorted to a quick iptables rule.

iptables -I INPUT -i br1 -d <DD-WRT's IP on guest net here> -j DROP

Basically this tells the firewall to DROP every packet that comes in from the br1 interface (make sure it’s the correct one in your config) and that is destined to its IP address on that interface.

To save and apply this rule log into the web interface, go to Administration/Commands, paste the command above (make sure you’ve inserted the correct IP) and then click on the “Save Firewall” button. Done.

Note: with this rule DD-WRT will be unreachable from that VLAN/SSID, even to you, so you’ll always have to access it from the main VLAN/network.

Categories
Linux Mac

Automatically download iOS firmwares

IPSW

Today I discovered that it takes quite a while to download an iOS IPSW, and when you need IPSWs, you are always in a hurry. So I made this little script that checks for a new release using icj.me’s API and downloads it. The comments in the script itself should make it pretty easy to use.

I added the script to my home server’s crontab, and scheduled it to run at 1 am every night, with a low bandwidth limit not to hog my connection.

Note: to use this on OS X you will have to either install wget (from sources, binaries, brew, ports, whatever) or edit the script to use curl.

Categories
Linux

What I learned about the current state of XBMC and Broadcom Crystal HD

In the last couple days I experimented a little with an old crappy laptop I had lying around for a while. I wanted to use it as a media center, but it was too old to support h264 hardware decoding, so playing 1080p content was basically impossible. So I bought a Broadcom BCM970012 Crystal HD hardware decoder for less than 20 euros on Amazon.
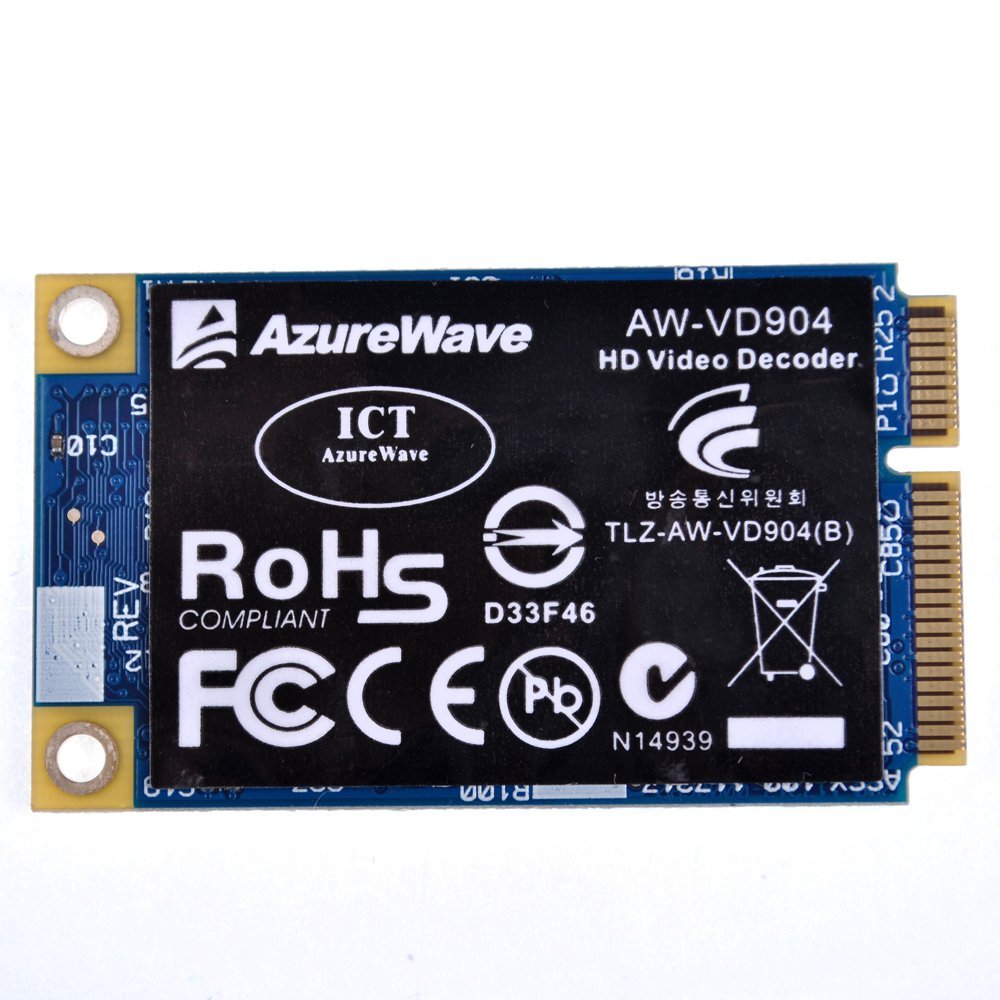
Broadcom Crystal HDThis little Mini PCI-E card handles the video decoding in hardware, and does so very efficiently, drawing almost no power. It became famous to enable 1080p on the 1st-gen Apple TV, which funnily enough has the same crappy GPU I have on my old laptop, an Nvidia GeForce Go 7300.

Broadcom is not supporting this card anymore, with the latest Linux driver available released in 2010. Anyway, I managed to get it working on XBMC 13.1 Gotham running on Debian Wheezy (7.0).

Getting the hardware to work

The first thing to note is that you have to run a 32 bit OS to be able to use this card reliably. I tried to use it on 64 bit installs of both Debian and Ubuntu, with no luck.

Second, support for Crystal HD will be dropped by Kodi (née XBMC) version 14.

Given this assumptions, I’ll briefly outline what was needed to get it to work.

First, I installed Debian. I opted for a net-install, in order to carefully choose only the packages I really needed. The laptop was quite old, so I didn’t want to bog it down with stuff I ultimately didn’t need. I went through the usual dance to install Nvidia’s proprietary drivers (version 304.x, since this is a legacy GPU), and installed alsa-utils in order to enable audio.

Debian doesn’t ship with the required crystalhd kernel module, so I had to compile my own. It was pretty easy (kernel 3.2.0-4-686-pae), I just followed the first part of this guide. Just in case it should disappear from the internet, I took the liberty to upload the source code here, and copy the required steps below:

  1. Install the required dependencies
    sudo apt-get install git automake g++ build-essential linux-headers
  2. Compile the driver
    cd crystalhd/driver/linux
    autoconf
    ./configure
    make
    sudo make install
  3. Compile the library
    cd ../../linux_lib/libcrystalhd/
    make
    sudo make install
  4. Load the driver
    sudo mod probe crystalhd

If all went as it should, you now have a working kernel module for Crystal HD cards.

In Debian Wheezy’s repos, you will find a really old version of XBMC (version 11). It will work, but I always prefer to have the latest stable version of everything. I dug around a bit, and found that in the official wheezy-backports repo there was a fairly recent Gotham release, 13.1RC1. I could have compiled a newer one, but it would have been more trouble than what it’s worth. So I went and added the repo to my sources.list, and installed the version from the repo.

echo "deb http://ftp.debian.org/debian/ wheezy-backports main contrib non-free" | sudo tee -a /etc/apt/sources.list
echo "deb-src http://ftp.debian.org/debian/ wheezy-backports main contrib non-free" | sudo tee -a /etc/apt/sources.list
sudo apt-get update
sudo apt-get -t wheezy-backports install xbmc

That’s it, Crystal HD decoding should now work without further actions.

The only thing was that it stopped working after waking from sleep. The solution was easy: save this script as /etc/pm/sleep.d/80crystalhd and make it executable with sudo chmod +x /etc/pm/sleep.d/80crystalhd.

#!/bin/bash
case $1 in
    hibernate)
        echo "Hey guy, we are going to suspend to disk!"
        modprobe -r crystalhd
        ;;
    suspend)
        echo "Oh, this time we're doing a suspend to RAM. Cool!"
        modprobe -r crystalhd
        ;;
    thaw)
        echo "oh, suspend to disk is over, we are resuming..."
        modprobe crystalhd
        ;;
    resume)
        echo "hey, the suspend to RAM seems to be over..."
        modprobe crystalhd
        ;;
    *)  echo "somebody is calling me totally wrong."
        ;;
esac

What this does, is it unloads the kernel module before suspending/hibernating and reloads it when the system wakes up. I didn’t think it would work even with XBMC still running, but it did.

Final touches

I then focused on cleaning up the experience of using XBMC:

  • It should launch automatically at boot time
  • It should be possibile to sleep/shutdown/restart from XBMC without needing the root password
  • The system should wake up on any USB activity

Autostart at boot

To launch XBMC at boot time you have to put a .xinitrc file in the home directory of XBMC’s user (from now on, I’ll assume that it’s xbmc, which makes sense).

#!/bin/bash
xbmc

Then, save this in /etc/init.d/xbmc and make it executable (sudo chmod +x /etc/init.d/xbmc)

#!/bin/sh
 
### BEGIN INIT INFO
# Provides:          xbmc
# Required-Start:    $all
# Required-Stop:     $all
# Default-Start:     2 3 4 5
# Default-Stop:      0 1 6
# Short-Description: starts instance of XBMC
# Description:       starts instance of XBMC using start-stop-daemon and xinit
### END INIT INFO
 
############### EDIT ME ##################
 
# path to xinit exec
DAEMON=/usr/bin/startx
 
# startup args
#DAEMON_OPTS=" /usr/local/bin/xbmc --standalone -- :0"
 
# script name
NAME=xbmc
 
# app name
DESC=XBMC
 
# user
RUN_AS=xbmc
 
# Path of the PID file
PID_FILE=/var/run/xbmc.pid
 
############### END EDIT ME ##################
 
test -x $DAEMON || exit 0
 
set -e
 
case "$1" in
  start)
        echo "Starting $DESC"
        start-stop-daemon --start -c $RUN_AS --background --pidfile $PID_FILE  --make-pidfile --exec $DAEMON -- $DAEMON_OPTS
        ;;
  stop)
        echo "Stopping $DESC"
        start-stop-daemon --stop --pidfile $PID_FILE
        ;;
 
  restart|force-reload)
        echo "Restarting $DESC"
        start-stop-daemon --stop --pidfile $PID_FILE
        sleep 5
        start-stop-daemon --start -c $RUN_AS --background --pidfile $PID_FILE  --make-pidfile --exec $DAEMON -- $DAEMON_OPTS
        ;;
  *)
        N=/etc/init.d/$NAME
        echo "Usage: $N {start|stop|restart|force-reload}" &gt;&amp;2
        exit 1
        ;;
esac
 
exit 0

Then, make it start at boot:

sudo update-rc.d xbmc defaults

Allow shutdown/sleep/reboot from XBMC

To do so, you need a “policy” file. Save this to /etc/polkit-1/localauthority/50-local.d/custom-actions.pkla

[Actions for xbmc user]
Identity=unix-user:xbmc
Action=org.freedesktop.upower.*;org.freedesktop.consolekit.system.*;org.freedesk​top.udisks.*
ResultAny=yes
ResultInactive=yes
ResultActive=yes

Allow wake from any USB peripheral

Add this line to /etc/rc.global, just before exit 0, and make it executable (chmod +x /etc/rc.local)

echo enabled | tee  /sys/bus/usb/devices/*/power/wakeup

 Conclusion

I may have forgotten something while writing this post. What I definitely forgot is when I needed to reboot to apply this changes. I know it is a very Windows-y thing to do, but reboot if things don’t seem to work.

Categories
Linux

Record and archive video from IP cameras

I’ve had a couple of Foscam FI9805W H264 IP cameras for almost a year, and I’ve been very happy with them: the 1280×960 image is sharp and clear both during the day and during the night, and their firmware has been very reliable.

FoscamCamera

One thing I wanted, though, was having the footage from the last 1-7 days available at any time. The onboard firmware allows to record to an FTP server, but this was suboptimal, there was no easy way to define the clip length and was pretty clunky to set up.

I started digging around, and I found that ffmpeg could easily record the RTSP stream from the cameras. In the cameras’ settings you can choose the video bitrate, up to 4 Mbit. I found that the optimal bitrate is 2 Mbit: going to 4 only meant that the files were twice the size without any noticeable improvement of the quality.
This results in approximately 15 Gb per day per camera of video files. This is way lower than 2 Mbit average, and that’s due to the fact that during the night, with the IR lights on, the image turns to black and white and the bitrate lowers to about half of the usual value.

I came up with a complete solution which is made of the following parts:

  • Two Foscam FI9805W IP cameras, but any reasonable number of cams can be used
  • My home server, running Debian, which is on 24/7
  • A cronjob that fires up ffmpeg every 15 minutes to record 15 minutes clips. This makes searching much easier than having to deal with giant multi-hour recordings.
  • A cronjob that triggers everyday at midnight, which converts recordings older than 24 hours to a much smaller low-framerate and low-quality files to reduce disk usage
  • A cronjob that triggers everyday at 4 am to purge older recordings.

Recording video

This is the easy part. I just use this script, which I named recordCam.sh:

You’ll have to edit the IP address, port number and login credentials to suit your needs and add/remove additional lines at the bottom to match the number of cameras you need to record. Also, set your own paths.

You need to add a cronjob to your system, to fire this script every 15 minutes:

*/15 * * * * /path/to/recordCam.sh

Quick tip: in the settings of each of your cameras, add a “Visitor” type user for esclusive use in this script, so that if somebody finds its password (which as you can see is saved in the clear) he cannot mess up with your cameras’ settings.

Converting to low-quality for archival

I decided I don’t need to save full-quality recordings of every single second, so my compromise was to heavily re-compress videos older than 24 hours (1440 minutes).

After lots of tests, I chose to reduce the framerate from 30 to 5 fps and set the bitrate to 100 kbits. That’s a really low bitrate for 960p videos, but since the footage is mostly static the quality is still half decent. The space usage is about 1 GB per day per camera.

The script I use, convertVideo.sh, is this:

It takes the file you pass to it, creates the appropriate folder structure and encodes it, then it deletes the original file.

This is the cronjob that launches the script:

0 0 * * * find /path/to/surveillance/folder/video/ -mmin +1440 -size +10000k -exec /path/to/convertVideo.sh {} \;

I use the find command to get the videos that need to be converted, and it looks for files over 10 megabytes that were last modified more than 1440 minutes ago. Of course, you are free to change these parameters as you wish.

Pruning old videos

Even with this heavy compression, the files add up quickly, so I decided it’s not worth keeping videos older than a week.

So, here is the cronjob to do the job (pun intended):

0 4 * * * find /path/to/surveillance/folder/archive -mindepth 3 -type d -mtime +5 -exec rm -r {} \;

It looks into the archive folders, looking for directories, as each day has its own, older than 5 days (that’s a weird side effect of confusing date math: you’ll end up having 7 days worth of recordings, plus the high quality last day).

The -mindepth 3 parameter was required due to the folder structure I chose, which is: archive/camXX/YYYY-MM/DD/*.mp4

  • At the first depth level there are the folders of each camera. Their last-modified date changes every time you add or remove a file/foder inside it, so this actually happens the 1st of evert month, when the month’s folder is created.
  • At the second level, there are the YYYY-MM folders, so we shouldn’t touch them
  • Finally, at the third level there are our “day” folders, which we want to delete when they get too old.

Then a final cronjob that removes old and empty month directories

1 4 * * * find /path/to/surveillance/folder/archive -mindepth 2 -maxdepth 2 -type d -empty -exec rmdir {} \;

You’re done

Yes. That’s it. I admit it’s not very straightforward, but it does work once all the pieces are in place. The nice thing is that all the mp4 files, both those saved directly from the cameras and the re-encoded ones play nicely on my iOS devices (I presume Android as well, but I don’t have a device handy to test), so I can just VPN back home to retrive a recording, should I need to.

If you have any questions feel free to leave a comment below, I’ll try to reply to everyone.