Categories
Mac

Add SSL support to podPress

podPress is a dead WordPress plugin that makes it easy to publish podcasts using WordPress, and I still use it on my podcast network, EasyPodcast. That is going to change once we deploy my own, custom built CMS, but I still have to use it for the time being.
podPress HTTPSThis week I switched everything to HTTPS, feeds and media delivery included, and podPress started having issue in detecting the episode mp3’s file size and duration when I provided either an http or https link to the file.

This is due to a couple issues: it wasn’t recognizing HTTPS URLs, since it had an hard-coded check to make sure they were served over HTTP (I can see the point: you wouldn’t want to serve podcasts over FTP). Once I patched this, the file size detection started working again (it just reads the content-length HTTP header).

I was still experiencing issues getting the mp3’s duration: to do so, podPress downloads the mp3 (with curl, since it’s available on my server) and analyzes it using the getID3 library. However, I found out that for some reason the download file had the HTTP headers prepended to its contents, so the library couldn’t properly parse the mp3. It was due to a curl option in the code that enables that behavior. Why that was added to podPress and why it wasn’t an issue over HTTP is beyond me.

The two changes I made are both in the podpress_admin_functions.php file, and involved lines 1028 (to allow SSL) and 1618 (to prevent HTTP headers from being written to the file).

Here’s the diff file.

Categories
Mac

Enable Guest Network on AirPort Basestations in Bridge Mode

TL;DR AirPort Basestations in Bridge Mode support the creation of Guest Networks, and all their traffic gets sent to VLAN 1003 on the Ethernet side.

I have a couple 5th-gen Apple AirPort Extreme Basestations in my house that I use to provide wifi access, together with a couple cheap TP-Link TL-WR841ND flashed with DD-WRT, and I run them all in bridge mode, as I don’t need their routing capablities. I rely on my PC-Engines Alix 2d2 running pfSense to be my router, so I just need wifi access points, not full-blown wireless routers.

One nice feature that you get if you do run AirPort Basestations as routers is the ability to have a completely isolated wifi network for guest use, that gets internet access but does not allow communication with devices on your private LAN.

Due to what I think is a bug in AirPort Utility, you can enable the guest network even when running your AirPort in bridge mode, the network is created and you can connect to it, but it looks like it doesn’t work: you don’t get an IP through DHCP, and any traffic seems to end nowhere.

After some Googling and Wiresharking, I found out that what actually happens is that AirPorts funnel all the guest network traffic to VLAN 1003, so if you have network equipment that is able to deal with VLANs you can actually use both Bridge Mode and Guest Network at the same time.

Luckily enough, my pfSense-based router is more than capable to do that, so I set up a Guest Interface on VLAN 1003, configured the DHCP server to assign addresses on that interface (on 10.10.10.0/24, while my main LAN runs on 192.168.1.0/24) and set up firewall rules to only allow traffic to the internet, and not to my LAN or other local subnets (such as my VPNs, and a second LAN I run on a different VLAN).

Categories
FreeBSD

ARP moved messages in FreeNAS/pfSense explained

kernel: arp: x.x.x.x moved from xx:xx:xx:xx:xx:xx to xx:xx:xx:xx:xx:xx on em0

Ever since adding a pfSense router and a FreeNAS box to my network, I noticed quite a few ARP moved messages in my system logs, and I finally found out what causes them.

TL;DR: Nothing to worry about.

Long(ish) version

First a little background. ARP messages are excahanged in ethernet networks (even wireless ones) in order to keep track to which physical (MAC) address each IP belongs to, so especially if you have static IP addresses or static leases in your DHCP server, you shouldn’t be seeing messages like these, which indicate that a given address is now assigned to a different device, hence the change of the MAC address.

I had noticed a couple interesting things about these MAC addresses: they all belong to Apple devices (you can check by entering the first three 2-character blocks in a lookup service), and one of tham always belonged to a Mac. The other one belonged to an AirPort base station (either an Extreme or an Express), which initially made me worry that somehow my Wi-Fi network was breached and somebody was connecting to it and stealing an IP. Actually it didn’t make much sense, unless the AirPort itself was hacked and used as a sort of relay.

After some googling, I came to this post on the FreeNAS forums where they explained that this behavior is due to a feature of AirPort base stations called sleep proxy.

Basically, when a Mac goes to sleep, its Bonjour-advertiesd services would disappear, making it no longer visibile on the network. AirPort base stations understand Bonjour, and they get notified when a Mac goes to sleep, so they start broadcasting the Mac’s services (file sharing, screen sharing, SSH, etc.) and “grab” its IP. This way, when somebody tries to access one of these services, either because they already knew the sleeping Mac’s IP or because they discovered it through Bonjour, the AirPort wakes the Mac by some kind of WOL technology, maybe a simple magic packet. When the Mac comes out from sleep, it takes its IP back, thus generating a second, opposite entry in pfSense’s/FreeBSD’s system log.

Categories
Mac

Display advanced info in AirPort Utility

Since version 6 AirPort Utility has sucked. That’s why I kept an old copy of version 5.6 around: I like the fact that it doesn’t assume you’re dumb, like 6 and later versions do.

However, there’s a way to display some useful information about the connected clients in an easy way (hat tip Marco Dalprato): hold ⌥ (option) while double clicking on the AirPort base station you want to inspect.

AirPort Utility 6 made more useful

Categories
Mac

Connect to CrashPlan running in a FreeNAS jail using OS X

I’ve got CrashPlan running on my FreeNAS-based home server1, and it is going smoothly. It was kinda pain to get it working (java problems, CrashPlan upgrades, and stuff like that), but now it has been behaving itself for a few months.

I don't know why I feel i should make these images in every post. Sorry.

Still, every now and then I want to check on it to keep track of the upload progress, change a few settings and what not.
Since I also run CrashPlan on my Mac, it has always been a pain to reconfigure everything each time I wanted to control the instance running in the FreeNAS jail and then back to the Mac’s.
Also, a while back CrashPlan changed their daemon-GUI authentication scheme: previously you just had to connect to the proper port on the right IP, now it also needs a token that seems to change randomly. It looks like it changes whenever the backup service restarts, but I’m not really sure, as my Mac’s doesn’t seem to change nearly as often, and my Macs power cycles way more than my server, but that’s an argument for another day. Also, the port seems to be randomly changing as well, so don’t even get me started about that.

Anyway, I had to find a way to get the current token, put it in the proper CrashPlan GUI’s config file (which is /Library/Application Support/CrashPlan/.ui_info in OS X), launch the GUI, do my business, close it and the put everything back.

To accomplish that, the first thing you need to do is to enable SSHd in the jail: connect to your main FreeNAS, type jls to get a list of all the running jails, and take note of CrashPlan’s JID.

[root@zeus] ~# jls
   JID  IP Address      Hostname                      Path
     1  -               VBox                          /mnt/Archivio/jails/VBox
     2  -               couchpotato_1                 /mnt/Archivio/jails/couchpotato_1
     3  -               crashplan_2                   /mnt/Archivio/jails/crashplan_2
     4  -               plexmediaserver_1             /mnt/Archivio/jails/plexmediaserver_1
     6  -               sonarr_1                      /mnt/Archivio/jails/sonarr_1
     7  -               transmission_1                /mnt/Archivio/jails/transmission_1

As you can see, mine is 3. So let’s connect to the jail: jexec 3 csh (which means launch the csh shell on jail number 3).

Now you need to edit the jail’s /etc/rc.conf, in order to have the SSH server start with the jail. You can do so by adding the following line:

sshd_enable="YES"

(Or, if present and set to NO, just switch it to YES and save the file.)

Now just start the SSH server with service ssh start.

The next step is to add a user to the jail: we’ll be using this instead of root to connect to it. Run adduser and follow the instructions. In the rest of this post the user will be luca. Why? Well, because reasons2.

Now switch to the newly created user and create a .ssh directory in the home directory.

su luca
mkdir ~/.ssh

Now it’s a good time to copy the SSH public key of your Mac’s account, which you can find in ~/.ssh/id_rsa.pub. Copy it to the clipboard:

cat ~/.ssh/id_rsa.pub | bcopy

Back to the jail, paste it into the ~/.ssh/authorized_keys file:

echo "PASTE HERE YOUR PUBLIC KEY" >> ~/.ssh/authorized_keys

After all this hard work, we can finally test our setup. Open a new terminal window/tab and try to connect (you’ll find the jail’s IP address in the FreeNAS web UI).

ssh luca@192.168.1.78

Of course replace luca with your user and the IP with the correct one. If all worked as it should, you’ll be asked (for the first time only) to accept the server’s RSA fingerprint, and then you’ll be logged in without needing a password.

Now that we have a working SSH server, let’s get to the main part of all this madness. Here’s my script, crashplan_remote.sh.

First, adjust line 8 and 9 replacing the placeholder user and IP with the one you set earlier.

Make the script executable (chmod +x /path/to/crashplan_remote.sh) and put it somewhere in your PATH (may I suggest /usr/local/bin?).

Before launching the script, I feel I should explain what it does. First of all it makes a backup of your current local GUI settings (root privileges needed here), then it connects to the jail, retrives the current token and port to connect to the service, puts them in the .ui_info config file (again, root required), creates an SSH tunnel that is used to avoid having the CrashPlan service directly exposed to the network (by default it listens on 127.0.0.1 only). Once the tunnel is established, it launches the CrashPlan GUI, which will now communicate with the remote service. Once you close it, the tunnel will be closed as well and the local settings will be put back in place (root privileges required).

If you’ve read this far, you just have to launch crashplan_remote.sh and the script will take care of everything for you. It will even tell you what it is doing, here’s the output I get:

[luca @ MBP-Luca-eth in ~ ✅ ] $ crashplan_remote.sh
Password: (I entered my password here, required by sudo)
PORT: 4343
TOKEN: th1sC0d3-iZn0-tTh3-C0rR-3ct0N3Y0L0OO
.ui_info updated, creating SSH tunnel...
SSH tunnel established, launching CrashPlan Desktop
CrashPlan Desktop closed, terminating SSH tunnel...
Exit request sent.
Restoring local CrashPlan settings...
  1. Nothing fancy: a Pentium G2020, 8 GB of RAM and 4×4 TB WD Red’s in RAIDZ1. I know RAIDZ1/RAID–5 is dead, but thanks to ZFS I should only loose those files that happen to suffer from UREs, and the important stuff is backed up elsewhere. I only regret I didn’t go for 5×4 TB drives, it should have improved speeds.
  2. My name is Luca. My user is called luca.
Categories
Mac

How to get rid of a stuck unread message badge on OS X

Having our messages (iMessage and SMS) available on our Macs is great, however sometimes we get an unread badge that can’t seem to go away, no matter how hard we look for the unread message, it is just not there1.MessagesBadgeIn many cases, however, the solution is simple, and you don’t even need to reboot.

  1. Quit Messages
  2. Restart the dock, either using Activity Monitor or running killall Dock from the terminal

Many thanks to crazyj on Stack Exchange for sharing this easy trick.

  1. Pro tip: you can see which conversations have unread messages by right clicking on the Messages icon. Not that opening these would help getting read of the stuck badge, however.
Categories
Mac

Send files to Evernote from Hazel

I finally decided that I want to move most of my paperless workflow to Evernote. Its search feature make it more convenient than going through a bunch of folders in Dropbox, and I guess that the fact that the bonus space I had gained through Dropbox’s Space Race has expired gave me the final push I needed to move my stuff.

So, I made a thing.

Evernote_secret_mail
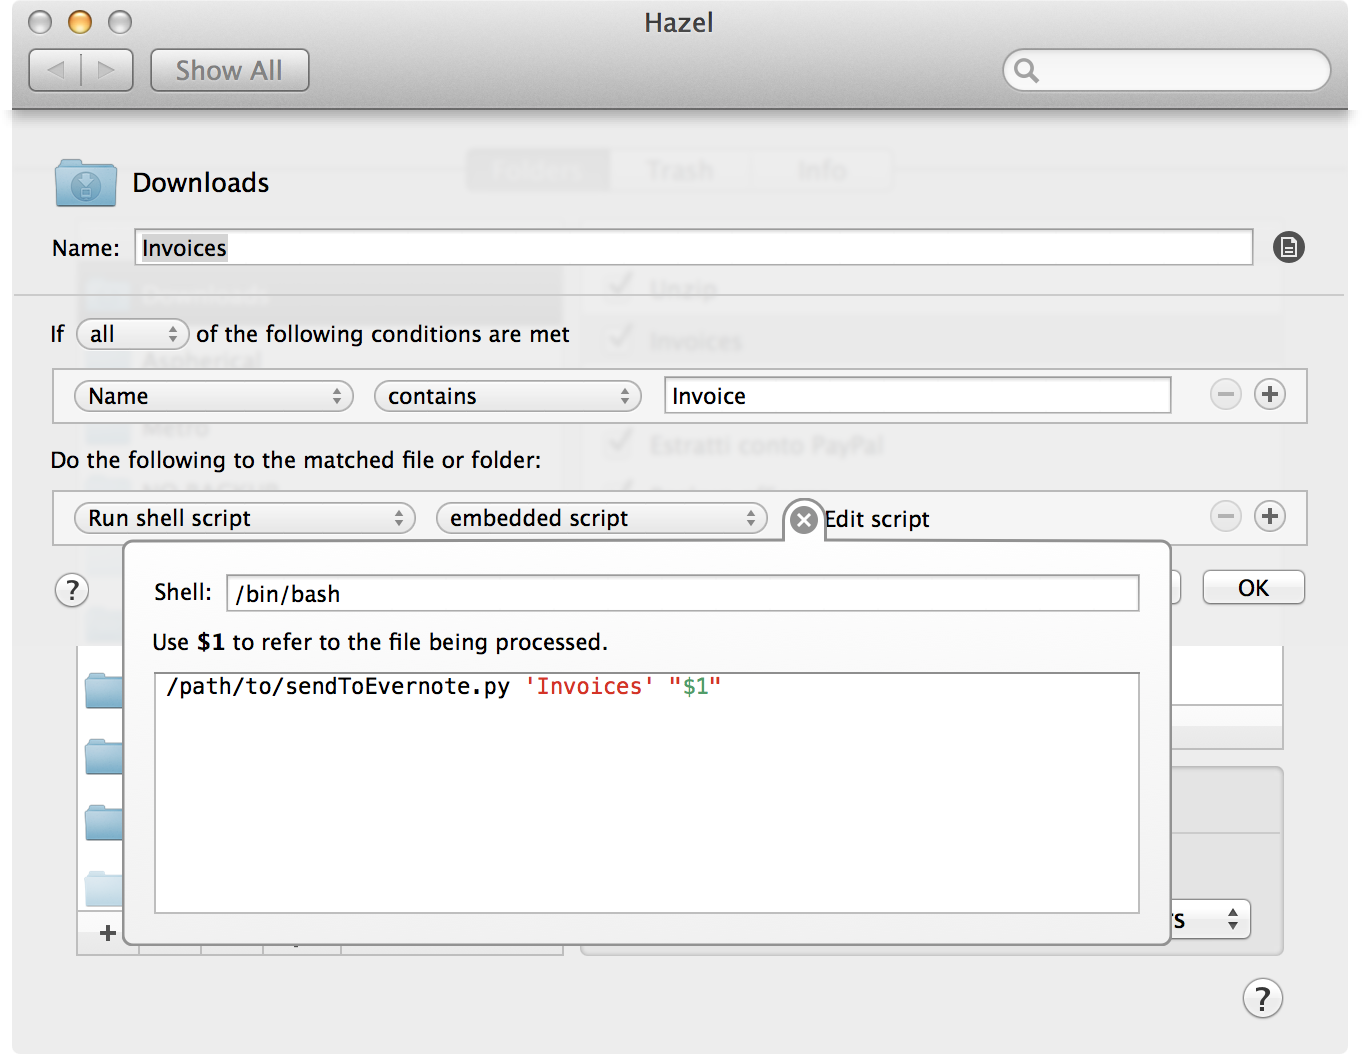
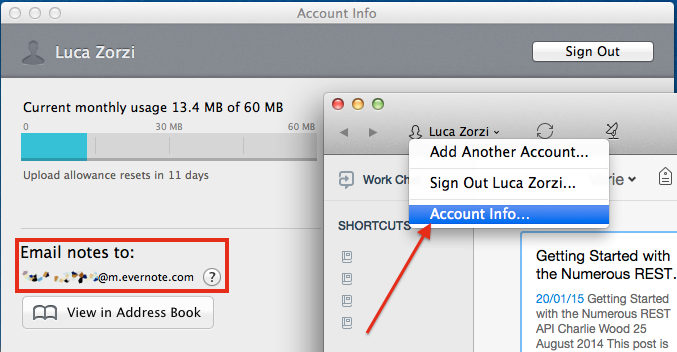
I called it sendToEvernote. It’s a Python script that mails the files you want to send to Evernote to the personal address every Evernote user gets after signing up. You can find yours in the “Account Info” section of the app, and you should make sure you keep it secret, otherwise you’re likely to get random junk in your notebooks.

You’ll find sendToEvernote on GitHub. Download it.

I’ll spare you some details about the script (you can find everything in the README file), and just go through what you need to do to get up and running with Hazel.

  1. Download the mailer Python module:
    sudo easy_install mailer
  2. Edit your email settings at the top of the script
  3. Make it executable:
    chmod +x /path/to/sendToEvernote.py

    PROTIP: drag the file into your terminal window instead of typing the path manually.

  4. Add a “Run shell script” action (embedded script) to your Hazel rule, and enter the following:
    /path/to/sendToEvernote.py "Notebook name" "$1"

Hazel Evernote rule That’s it.

Categories
Mac

Delete undeletable files on OS X

Today I found myself stuck: I couldn’t delete a directory from my Mac, no matter what I tried, sudo or not.

Undeletable file
Turns out, for some reason the schg flag was set on that folder. schg, or “system immutable” flag, prevents even root from doing anything with that file. Fortunately, root is allowed to remove that flag, and then delete the file.

sudo chflags noschg undeletable_file_or_folder
sudo rm -rf  undeletable_file_or_folder

Problem solved.

(Always be careful copying and pasting sudo rm -rf commands from the internet.)

Categories
Mac

Recover Ableton Live’s recording after a crash

Last night, I was recording a podcast using Ableton Live as usual, and my Mac kindly decided that it was time for a kernel panic. This left me with a few unusable .aiff files, that couldn’t be opened in Live, in QuickLook or any other app.

CorruptedAIFF

It looked like I was screwed. Enter Audacity, one of the ugliest applications available for OS X. It has a great feature: it can open raw PCM data, and it was able to successfully recover the whole recording. You just have to click on File/Import/Raw Data and select the corrupted AIFF file. A window like this will pop up:

AudacityRawSettings

You’ll have to adjust some settings to match Live’s. I used 44.1 kHz 16 bit mono, but make sure to check your Ableton recording settings to get yours. Don’t worry if you set them wrong, it won’t touch your original file, it will simply not play correctly in Audacity.

Once you have successfully imported your track, you can export it from Audacity in just about any format you might need.

Categories
Linux Mac

Automatically download iOS firmwares

IPSW

Today I discovered that it takes quite a while to download an iOS IPSW, and when you need IPSWs, you are always in a hurry. So I made this little script that checks for a new release using icj.me’s API and downloads it. The comments in the script itself should make it pretty easy to use.

I added the script to my home server’s crontab, and scheduled it to run at 1 am every night, with a low bandwidth limit not to hog my connection.

Note: to use this on OS X you will have to either install wget (from sources, binaries, brew, ports, whatever) or edit the script to use curl.