Categories
Mac

Run Hazel rule based on the day of the week

Hazel-for-Mac-iconI LOVE HAZEL.

Now that I made that clear, let’s get into the actual stuff.

As many of you will know, Hazel is a great Mac utility that lets you automatically do stuff to files. You can move files based on their name/size/extension/you name it, and do a bunch of cool stuff with them, without ever having to write a single line of code.

Today I needed to write a rule that would act based on the day of the week a file was created1.

Turns out, Hazel can do that (not much of a surprise, huh?), but this time I didn’t find it particularly intuitive how to do it. You have to use the “Occurs after” function on the “Created date” (or any date, actually). In this example, this rules will only run on files that have been created after 00.00 on Mondays only, i.e. any file created on Mondays.

Hazel rule day of week(Don’t be confused by the weird names on the “day of week” submenu, they’re just the Italian names for the days of the week.)

The cool thing is that you can select more than one day, so as always Hazel is very flexible.

  1. I use a Sony ICD PX333 Voice Recorder to record classes, and I want to rename them based on the day of the week, since what we do depends on the day of the week
Categories
Mac

Clipboard new-line format when copying from Preview

Today I helped my brother with a Keyboard Maestro macro he needed. Basically, he wanted to take some text from a PDF created by Notability, which inserts new lines to have text flow around images, and remove these new lines.

Preview

Pretty easy, I thought: pbpaste to tr and remove \n. Nope. For some reason, maybe some old Mac OS 9 heritage, when copying text from Preview new lines are saved as carriage returns, i.e. \r.

This stupid behavior means that if you try to pbpaste something which contains line breaks in your terminal, you only get the last line. You can view the full output by replacing \r with \n:

pbpaste | tr '\r' '\n'

This lame thing had me waste some time, so I hope this short post makes your life easier.

P.S.: The full command I had my brother put in Keyboard Maestro is:

pbpaste | tr '\r' ' ' | pbcopy

Followed by a Paste action. This replaces line breaks with spaces and pastes the result.

Categories
Linux

What I learned about the current state of XBMC and Broadcom Crystal HD

In the last couple days I experimented a little with an old crappy laptop I had lying around for a while. I wanted to use it as a media center, but it was too old to support h264 hardware decoding, so playing 1080p content was basically impossible. So I bought a Broadcom BCM970012 Crystal HD hardware decoder for less than 20 euros on Amazon.

Broadcom Crystal HDThis little Mini PCI-E card handles the video decoding in hardware, and does so very efficiently, drawing almost no power. It became famous to enable 1080p on the 1st-gen Apple TV, which funnily enough has the same crappy GPU I have on my old laptop, an Nvidia GeForce Go 7300.

Broadcom is not supporting this card anymore, with the latest Linux driver available released in 2010. Anyway, I managed to get it working on XBMC 13.1 Gotham running on Debian Wheezy (7.0).

Getting the hardware to work

The first thing to note is that you have to run a 32 bit OS to be able to use this card reliably. I tried to use it on 64 bit installs of both Debian and Ubuntu, with no luck.

Second, support for Crystal HD will be dropped by Kodi (née XBMC) version 14.

Given this assumptions, I’ll briefly outline what was needed to get it to work.

First, I installed Debian. I opted for a net-install, in order to carefully choose only the packages I really needed. The laptop was quite old, so I didn’t want to bog it down with stuff I ultimately didn’t need. I went through the usual dance to install Nvidia’s proprietary drivers (version 304.x, since this is a legacy GPU), and installed alsa-utils in order to enable audio.

Debian doesn’t ship with the required crystalhd kernel module, so I had to compile my own. It was pretty easy (kernel 3.2.0-4-686-pae), I just followed the first part of this guide. Just in case it should disappear from the internet, I took the liberty to upload the source code here, and copy the required steps below:

  1. Install the required dependencies
    sudo apt-get install git automake g++ build-essential linux-headers
  2. Compile the driver
    cd crystalhd/driver/linux
    autoconf
    ./configure
    make
    sudo make install
  3. Compile the library
    cd ../../linux_lib/libcrystalhd/
    make
    sudo make install
  4. Load the driver
    sudo mod probe crystalhd

If all went as it should, you now have a working kernel module for Crystal HD cards.

In Debian Wheezy’s repos, you will find a really old version of XBMC (version 11). It will work, but I always prefer to have the latest stable version of everything. I dug around a bit, and found that in the official wheezy-backports repo there was a fairly recent Gotham release, 13.1RC1. I could have compiled a newer one, but it would have been more trouble than what it’s worth. So I went and added the repo to my sources.list, and installed the version from the repo.

echo "deb http://ftp.debian.org/debian/ wheezy-backports main contrib non-free" | sudo tee -a /etc/apt/sources.list
echo "deb-src http://ftp.debian.org/debian/ wheezy-backports main contrib non-free" | sudo tee -a /etc/apt/sources.list
sudo apt-get update
sudo apt-get -t wheezy-backports install xbmc

That’s it, Crystal HD decoding should now work without further actions.

The only thing was that it stopped working after waking from sleep. The solution was easy: save this script as /etc/pm/sleep.d/80crystalhd and make it executable with sudo chmod +x /etc/pm/sleep.d/80crystalhd.

#!/bin/bash
case $1 in
    hibernate)
        echo "Hey guy, we are going to suspend to disk!"
        modprobe -r crystalhd
        ;;
    suspend)
        echo "Oh, this time we're doing a suspend to RAM. Cool!"
        modprobe -r crystalhd
        ;;
    thaw)
        echo "oh, suspend to disk is over, we are resuming..."
        modprobe crystalhd
        ;;
    resume)
        echo "hey, the suspend to RAM seems to be over..."
        modprobe crystalhd
        ;;
    *)  echo "somebody is calling me totally wrong."
        ;;
esac

What this does, is it unloads the kernel module before suspending/hibernating and reloads it when the system wakes up. I didn’t think it would work even with XBMC still running, but it did.

Final touches

I then focused on cleaning up the experience of using XBMC:

  • It should launch automatically at boot time
  • It should be possibile to sleep/shutdown/restart from XBMC without needing the root password
  • The system should wake up on any USB activity

Autostart at boot

To launch XBMC at boot time you have to put a .xinitrc file in the home directory of XBMC’s user (from now on, I’ll assume that it’s xbmc, which makes sense).

#!/bin/bash
xbmc

Then, save this in /etc/init.d/xbmc and make it executable (sudo chmod +x /etc/init.d/xbmc)

#!/bin/sh
 
### BEGIN INIT INFO
# Provides:          xbmc
# Required-Start:    $all
# Required-Stop:     $all
# Default-Start:     2 3 4 5
# Default-Stop:      0 1 6
# Short-Description: starts instance of XBMC
# Description:       starts instance of XBMC using start-stop-daemon and xinit
### END INIT INFO
 
############### EDIT ME ##################
 
# path to xinit exec
DAEMON=/usr/bin/startx
 
# startup args
#DAEMON_OPTS=" /usr/local/bin/xbmc --standalone -- :0"
 
# script name
NAME=xbmc
 
# app name
DESC=XBMC
 
# user
RUN_AS=xbmc
 
# Path of the PID file
PID_FILE=/var/run/xbmc.pid
 
############### END EDIT ME ##################
 
test -x $DAEMON || exit 0
 
set -e
 
case "$1" in
  start)
        echo "Starting $DESC"
        start-stop-daemon --start -c $RUN_AS --background --pidfile $PID_FILE  --make-pidfile --exec $DAEMON -- $DAEMON_OPTS
        ;;
  stop)
        echo "Stopping $DESC"
        start-stop-daemon --stop --pidfile $PID_FILE
        ;;
 
  restart|force-reload)
        echo "Restarting $DESC"
        start-stop-daemon --stop --pidfile $PID_FILE
        sleep 5
        start-stop-daemon --start -c $RUN_AS --background --pidfile $PID_FILE  --make-pidfile --exec $DAEMON -- $DAEMON_OPTS
        ;;
  *)
        N=/etc/init.d/$NAME
        echo "Usage: $N {start|stop|restart|force-reload}" >&2
        exit 1
        ;;
esac
 
exit 0

Then, make it start at boot:

sudo update-rc.d xbmc defaults

Allow shutdown/sleep/reboot from XBMC

To do so, you need a “policy” file. Save this to /etc/polkit-1/localauthority/50-local.d/custom-actions.pkla

[Actions for xbmc user]
Identity=unix-user:xbmc
Action=org.freedesktop.upower.*;org.freedesktop.consolekit.system.*;org.freedesk​top.udisks.*
ResultAny=yes
ResultInactive=yes
ResultActive=yes

Allow wake from any USB peripheral

Add this line to /etc/rc.global, just before exit 0, and make it executable (chmod +x /etc/rc.local)

echo enabled | tee  /sys/bus/usb/devices/*/power/wakeup

 Conclusion

I may have forgotten something while writing this post. What I definitely forgot is when I needed to reboot to apply this changes. I know it is a very Windows-y thing to do, but reboot if things don’t seem to work.

Categories
Linux

Record and archive video from IP cameras

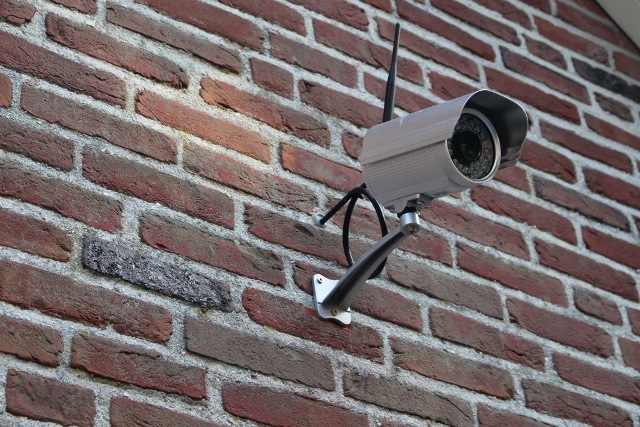
I’ve had a couple of Foscam FI9805W H264 IP cameras for almost a year, and I’ve been very happy with them: the 1280×960 image is sharp and clear both during the day and during the night, and their firmware has been very reliable.

FoscamCamera

One thing I wanted, though, was having the footage from the last 1-7 days available at any time. The onboard firmware allows to record to an FTP server, but this was suboptimal, there was no easy way to define the clip length and was pretty clunky to set up.

I started digging around, and I found that ffmpeg could easily record the RTSP stream from the cameras. In the cameras’ settings you can choose the video bitrate, up to 4 Mbit. I found that the optimal bitrate is 2 Mbit: going to 4 only meant that the files were twice the size without any noticeable improvement of the quality.
This results in approximately 15 Gb per day per camera of video files. This is way lower than 2 Mbit average, and that’s due to the fact that during the night, with the IR lights on, the image turns to black and white and the bitrate lowers to about half of the usual value.

I came up with a complete solution which is made of the following parts:

  • Two Foscam FI9805W IP cameras, but any reasonable number of cams can be used
  • My home server, running Debian, which is on 24/7
  • A cronjob that fires up ffmpeg every 15 minutes to record 15 minutes clips. This makes searching much easier than having to deal with giant multi-hour recordings.
  • A cronjob that triggers everyday at midnight, which converts recordings older than 24 hours to a much smaller low-framerate and low-quality files to reduce disk usage
  • A cronjob that triggers everyday at 4 am to purge older recordings.

Recording video

This is the easy part. I just use this script, which I named recordCam.sh:

You’ll have to edit the IP address, port number and login credentials to suit your needs and add/remove additional lines at the bottom to match the number of cameras you need to record. Also, set your own paths.

You need to add a cronjob to your system, to fire this script every 15 minutes:

*/15 * * * * /path/to/recordCam.sh

Quick tip: in the settings of each of your cameras, add a “Visitor” type user for esclusive use in this script, so that if somebody finds its password (which as you can see is saved in the clear) he cannot mess up with your cameras’ settings.

Converting to low-quality for archival

I decided I don’t need to save full-quality recordings of every single second, so my compromise was to heavily re-compress videos older than 24 hours (1440 minutes).

After lots of tests, I chose to reduce the framerate from 30 to 5 fps and set the bitrate to 100 kbits. That’s a really low bitrate for 960p videos, but since the footage is mostly static the quality is still half decent. The space usage is about 1 GB per day per camera.

The script I use, convertVideo.sh, is this:

It takes the file you pass to it, creates the appropriate folder structure and encodes it, then it deletes the original file.

This is the cronjob that launches the script:

0 0 * * * find /path/to/surveillance/folder/video/ -mmin +1440 -size +10000k -exec /path/to/convertVideo.sh {} \;

I use the find command to get the videos that need to be converted, and it looks for files over 10 megabytes that were last modified more than 1440 minutes ago. Of course, you are free to change these parameters as you wish.

Pruning old videos

Even with this heavy compression, the files add up quickly, so I decided it’s not worth keeping videos older than a week.

So, here is the cronjob to do the job (pun intended):

0 4 * * * find /path/to/surveillance/folder/archive -mindepth 3 -type d -mtime +5 -exec rm -r {} \;

It looks into the archive folders, looking for directories, as each day has its own, older than 5 days (that’s a weird side effect of confusing date math: you’ll end up having 7 days worth of recordings, plus the high quality last day).

The -mindepth 3 parameter was required due to the folder structure I chose, which is: archive/camXX/YYYY-MM/DD/*.mp4

  • At the first depth level there are the folders of each camera. Their last-modified date changes every time you add or remove a file/foder inside it, so this actually happens the 1st of evert month, when the month’s folder is created.
  • At the second level, there are the YYYY-MM folders, so we shouldn’t touch them
  • Finally, at the third level there are our “day” folders, which we want to delete when they get too old.

Then a final cronjob that removes old and empty month directories

1 4 * * * find /path/to/surveillance/folder/archive -mindepth 2 -maxdepth 2 -type d -empty -exec rmdir {} \;

You’re done

Yes. That’s it. I admit it’s not very straightforward, but it does work once all the pieces are in place. The nice thing is that all the mp4 files, both those saved directly from the cameras and the re-encoded ones play nicely on my iOS devices (I presume Android as well, but I don’t have a device handy to test), so I can just VPN back home to retrive a recording, should I need to.

If you have any questions feel free to leave a comment below, I’ll try to reply to everyone.

Categories
Mac

WeMo Control Workflow for Alfred


UPDATE October 2014

Belkin seems to have changed the ports the Wemo’s server listens on, so I updated the workflow. Download and replace your current install (you’ll have to set the IP again). Wemo-Switch Today I had some spare time, so I decided to hack together a simple Alfred Workflow to be able to control my Belkin WeMo Switch (Amazon US, Amazon IT) from my Mac. TL; DR: Download and enter WeMo IP in the “Script Filter” block. Type wemo to launch it. After some googling, I found this nice bash script that allowed me to send commands to the WeMo. It was then just a matter of encapsulating it into a nice Alfred wrapper, and it was relatively easy. WeMo-WorkflowIn order to use my workflow, just download it, install it, open it in Alfred and enter your WeMo’s IP address into the “Script Filter” block. If you also want to use keyboard hotkeys to turn on/turn off/toggle your WeMo, type in the IP in the lower “Run Script” block as well. Open up the Hotkey blocks to edit them. Now that you’re all set, type wemo to get some info about your WeMo. Press enter on the status row to toggle it. Or you can also type wemo on or wemo off to quickly control your switch. The workflow currently supports only one device. I’d love to add support for multiple ones, but I only own one WeMo so it’d be very hard for me to develop the workflow without being able to test it. The Amazon links above are both affiliate links, if you buy a WeMo through one of them you don’t pay any extra and I get a few cents from Amazon.

Categories
Mac

Get rid of the “Open from iCloud” window in Mavericks

Since the introduction of iCloud in many OS X apps in Mountain Lion, we’ve had to live with the pointless “Open from iCloud” window every time we launched these apps. I’m speaking mainly of TextEdit and Preview, but recently even more apps got this useful feature, such as Automator and AppleScript Editor.

iCloud for TextEdit - we all hate this.
This. We all hate this.

But last month Apple released Mavericks, which came to save us from this hell. It offers a great solution: the ability to enable/disable iCloud on a per-app basis, thus allowing us to only have it on apps that benefit from it (Pages and Byword, for example).

Without further ado, let’s go and kill iCloud for TextEdit & co.

It’s pretty easy: just go to System Preferences/iCloud and click the “Options…” button next to “Documents & Data.

System Preferences/iCloud/Documents & Data/Options…A nice popover will appear and it will let you chose the apps in which iCloud documents will be available. Deselect any apps you wish, and then click “Done”.

DIsable iCloud documents in unnecessay appsFreedom. Enjoy the sense of freedom that comes from your apps being iCloud-free again, like in the good ol’ days.

Now, the next time you open TextEdit, you will be greeted with a glorious empty document, ready to be filled with your awesome words.

TextEdit is now iCloud-free


Categories
Mac

Introducing SoundBlossomer

SoundBlossomer LogoA while back I wrote about my hack that allowed me to have multiple instances of Soundflower that I used to record a multi-track Skype group call for podcasting purposes. That guide became pretty popular, and it was even linked in Cycling 74’s blog.

Today I’m introducing a new project, SoundBlossomer, a little utility that lets you easily add, edit and delete your Soundflower audio interfaces.

Basically, this app figures out which Soundflower instances you already have defined in your /System/Library/Extensions/Soundflower.kext/Contents/Info.plist file and shows them in a list, allowing you to add additional ones, as well as renaming, changing the number of channels and deleting the other ones.

SoundBlossomer Screenshot

I spent about a day putting together this app, which by the way is my first Mac app ever, and I think it works reasonably well, at least in all the testing I’ve made. If you find any issues, please, let me know.

SoundBlossomer is 100% open source, it is released under the BSD license and you can find all of its source code on the GItHub page. I strongly encourage you to check it out, and even to improve it if you can, I’d gladly pull your changes into the main repository.

Categories
Linux

Avoid stuttering streaming from NFS shares with XBMC on the Raspberry Pi

I’ve been using my Raspberry Pi with XBMC (using the awesome Raspbmc distro) for a while now, I even control it using my CEC-Compatible HDTV’s remote, but I pretty much always experienced stuttering while playing 1080p videos streaming from my home server, which was mounted on the Pi via NFS (directly through its /etc/fstab).Raspberry XBMCI dismissed the issue telling myself “it’s just not powerful enough”. But that’s not really the case. Not always, at least.

A little background

The Pi has an onboard GPU capable of decoding 1080p H.264 video, but it has no hardware acceleration for audio, which often leads to issues. DTS and AC3 often are difficult beasts for the board’s underpowered processor, unless you have a TV which is capable of decoding them on its own, in which case you just have to enable DTS/AC3 passthrough in XBMC’s settings.

If you quickly google “raspberry xbmc stutter”, audio tracks are often mentioned as responsible for poor playback, and it usually helps to play stereo versions of the movie sound track, if available. I convert all my movies (which generally come in the form of MKV files) using iFlicks, in order to make them iTunes and iOS-friendly. It always creates an AAC-encoded stereo track for each language, so it’s always available to help the poor ARM chip.

A solution (for me)

Still, my 1080p files stuttered, while 720p played flawlessly. Just for the sake of curiosity, I tried copying one of these movies to an USB thumbdrive, and I attached it directly to the Raspberry Pi. To my surprise, it played smoothly.

I also noticed that playing the same file over HTTP (I also have a web server running on my home server), was just as good.

So it looked like NFS was the one causing troubles. I posted on STM Labs’ (the makers of Raspbmc) forum, and I was told to try to play around with NFS mount options in my /etc/fstab, since I was probably getting an insufficient throughput that caused stuttering. Well, that did the trick. After some trial and error, here is my “magic” line that gives me a great 11,7 Mb/s speed reading files from my NAS (that’s very close to the physical limit of the Pi’s 100 Mbit port, which is more than enough even for 1:1 BluRay rips).

192.168.1.77:/multimedia /thor nfs udp,noatime,rsize=32768,wsize=32768,nolock,nfsvers=3 0 0

You’ll have to adjust your server address, path and mount point, but the mount parameters will likely work for you as well.

OpenElec

UPDATE: Andrew T suggested a better way to configure OpenELEC to mount NFS shares at boot, you will find it in the comments below this post.

As MartinP pointed out in the comments, due to OpenElec’s root filesystem being mounted read-only, editing /etc/fstab isn’t possibile.

However, it is possibile to edit /storage/.config/autostart.sh to run the mount command at boot. As an example, you can edit it like this:

#!/bin/sh
sleep 25
mount -t nfs 192.168.1.77:/multimedia /thor -o udp,noatime,rsize=32768,wsize=32768,nolock,nfsvers=3

As noted for /etc/fstab, adjust the server IP, share name and mount point as needed.

Categories
Mac

Take retina screenshots on non-retina Macs

A few minutes ago, I posted about using curl to inspect HTTP headers, and I included a screenshot of the terminal window. Then I opened the page on my Retina iPad: the screenshot looked awful, to say the least.

Retina display icon

So I googled a bit and found this awesome Gist by Simone Manganelli, that shows the commands needed to enable “HiDPI” modes on regular Macs. These modes use four pixels on the screen for each “logical” pixel, just like Retina screens do. This will of course greatly decrease the available screen real estate, but on my 2560×1440 27-inch monitor it’s not much of an issue, not for the time needed to take a screenshot, at least.

The first command will make these mode available for selection from System Preferences/Display, the second will remove them. Note that you need to log out and then back in after issuing the first command to see the newly added resolutions.

Using this trick I was able to capture a much higher res screenshot, that definitely looks better on Retina screens.

Categories
Linux Mac

Check the headers sent by a web server using curl

If you ever wanted to easily and quickly check the headers sent by any web server you can do it with curl. It comes preinstalled in OS X as well as in many Linux distributions, and it makes this operation really straightforward.

Curl in action showing HTTP headers

Just launch

curl -I http://somesite.com/

and you’ll get every response header sent by the site. Easy, huh?