Categories
Linux

IPv6 route keeps getting re-added on Linux

One of my Raspberry Pis is connected to a VLAN through a cheap Netgear switch, and on that VLAN there is a /24 IPv4 network and a /64 IPv6 network.
On my regular (untagged) LAN, different IPv4 and IPv6 networks are used.

I noticed that somehow the Pi kept getting a route for the LAN /64 through its ethernet interface, without going through the router. That is not supposed to happen. As soon as I deleted the route (sudo ip route del IPv6_NET/64), it was re-added. This prevented any of the two subnets to talk to each other through the router, because the Pi did not send the traffic to the router, but tried to send it as if the other host were on the same network segment.

Then, suddenly, I remembered that I had to restart that stupid switch because I had to move its power brick to a different outlet: somehow while booting it ignored all VLAN configuration, so for a few seconds the Pi was connected to the main VLAN, got the route advertisment whiche for some reason dhcpcd kept hanging on and dutifully re-adding every time I deleted it.

The solution was easy: sudo systemctl restart dhcpcd

Categories
FreeBSD Linux Mac

BASH: Capturing both the output and the exit code of a process

Of course I found an answer to this in a collection of Stack Overflow questions, but to make things easier for anybody who might stumble into this post (and mainly for Future Me), here’s the answer.

Seriously, don’t do this.

Basically I have a command that sometimes produces an error, but usually just re-running it produces the correct output. When it encounters an error, it dutifully sets its error code to something other than 0 (success). But how to I capture both the command’s output and its exit code? This way.

output=$(myCommandWhichSometimesDoesntWork)
exit_code=$? # This HAS to be exeuted right after the command above

So I made a little wrapper script that repeatedly calls the first one until it gets an answer, with a set maximum number of retries to avoid infinite loops.

#!/bin/bash
retries=0
max_retries=10 # Change this appropriately
 
# The "2> /dev/null" silences stderr redirecting it to /dev/null
# The command must be first executed outside of the while loop:
# bash does not have a do...while construct
output=$(myCommandWhichSometimesDoesntWork 2> /dev/null)
while [[ $? -gt 0 ]]
do
        ((retries++))
        if [[ retries -gt max_retries ]]
        then
                exit 1
        fi
 
        output=$(myCommandWhichSometimesDoesntWork 2> /dev/null)
done
 
echo $output
Categories
FreeBSD Linux

Improve FreeNAS NFS performance when used with Proxmox

TL;DR: zfs set sync=disabled your/proxmox/dataset

Lately I’ve been playing around with Proxmox installed on an Intel NUC (the cleverly named NUC6CAYH, to be precise), and I must say it is really, really, cool.

I usually store my containers and VMs on the local 180 GB SSD that used to be in my old MacBook Pro, since it’s reasonably fast and it works well, but I wanted to experiment with NFS-backed storage off my FreeNAS box (4x4TB WD Reds in RAIDZ1, 16 GBs of RAM, an i5–3330 processor).

Frankly, I was pretty unsatisfied with the performance I was getting. Everything felt pretty slow, especially compared to the internal SSD and, surprisingly, to storing the same data on a little WD MyCloud (yes, the one with the handy built-in backdoor).

My very unscientific test was creating a fresh container based on Ubuntu 16.04, and upgrading the stock packages that came with it. As of today, it meant installing around 95 MB’s worth of packages, and a fair bit of I/O to get everything installed.

The task was completed in around 1’30″ with the container on the internal SSD, 2’10″ on the WD MyCloud, and an embarassing 7’15″ on the FreeNAS box.

After a bit of googling, I came to an easy solution: set the sync property of the ZFS dataset used by Proxmox to disabled (it is set to standard by default).

The complete command is zfs set sync=disabled your/proxmox/dataset (run that on FreeNAS as root or using sudo).

To be honest, I don’t really know the data-integrity implications of this flag: both machines and the switch between them are protected from power failures by two UPSs, so that shouldn’t be much of an issue.

Anyway, just changing that little flag signlificantly reduced the time required to complete my “benchmark”, bringing it down to around 1’40″, very close to Proxmox’s internal SSD. Again, at the moment I don’t really need to run VMs/CTs off the FreeNAS storage, but it is good to know that it is possible to achieve much faster performance with this little tweak.

Categories
FreeBSD

How to use a USB drive with FreeNAS

First of all, a disclaimer: I use this setup just as a secondary backup, I do not recommend you rely on USB drives as storage media for your FreeNAS server.

Overview

I have a few spare 2 TB drives that used to be in my homeserver, and I wanted to connect them to my FreeNAS every few weeks to store some backups on them, then disconnect them and put them in a drawer.

Preparing the USB hard drive

If your drives are not brand new, chances are you already have some data on them, so you’ll need to wipe them first. To do so, connect your drives to FreeNAS, login to the webinterface, go to the Storage tab, click on “View Disks”, select the correct one from the list, then click on the “Wipe” button on the bottom of the screen.

Everything will turn red now. That’s because you’re doing something potentially dangerous. Make sure you really select the correct drive, otherwise you might destroy all of your data.
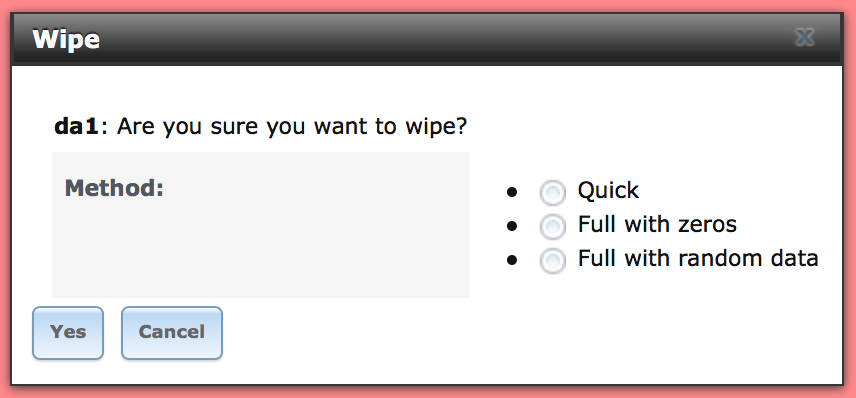
A Quick wipe is usually enough. Select that and proceed.

Once the wipe is completed, you can turn the disk into a Volume you can use on FreeNAS, just like your main one(s). Head over to the Storage tab, click on the “Volume Manager” button. You will see your newly wiped disk there, give it a volume name, tick the “Encryption” checkbox if you’d like, then click on “Add Volume”. I’ll call mine “ColdStorage” for the purpose of this tutorial.

Do NOT select any “Volume to extend”. That would mean you’d be adding a single (USB!) hard drive striped to your main pool, and that drive would become the single point of failure for all the data in that pool.

After the disk has been initialized, you can start adding datasets, clone other ones, setup network sharing, whatever.

Disconnecting the USB drive

Once you’re done with it, you will want to disconnect your USB drive to store it somewhere. To do so, once again go to the Storage Tab, select your pool from the list (ColdStorage in this example), then click on the “Detach Volume” button. You will only see this button if you select the pool, while if you select the dataset with the same name you will get a different set of buttons.

I’m not sure that I have to point that out, but let’s do it anyway: do NOT select “Mark the disks as new (destroy data)”. Once the pool has been detached, you can disconnect the USB drive.

Reconnecting the USB drive

For the thousandth time, go back to your trusty Storage tab, then click on the “Import Volume” button. A box will appear, select wether you have an encrypted volume or not, then click OK. FreeNAS will stop a few seconds to reflect on the good it’s made in its life, then it will present you a dropdown from which you’ll be able to select your USB volume. Click OK and it will be once again available in FreeNAS.


Categories
Mac

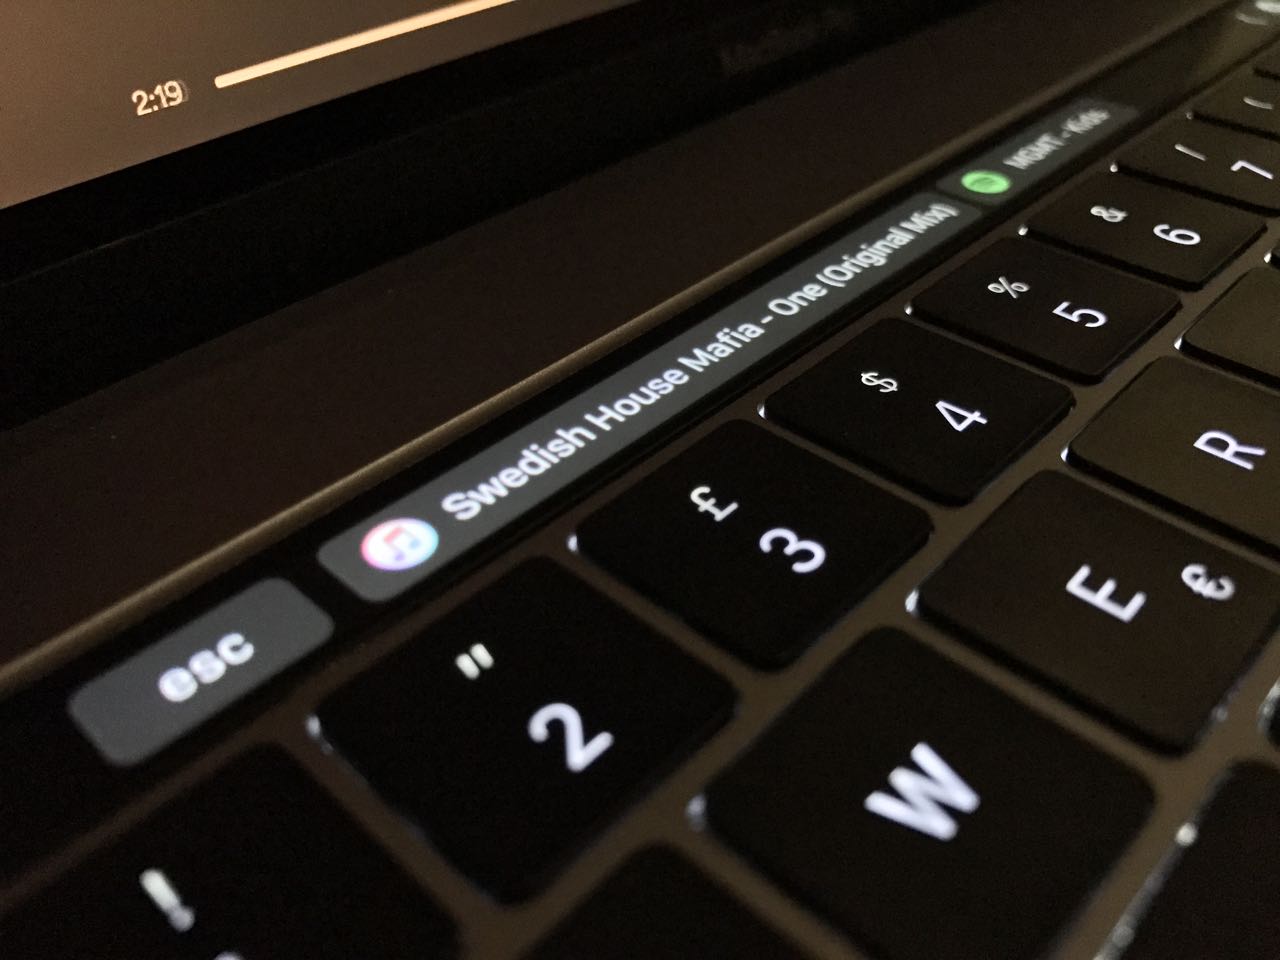
Display the currently playing track in iTunes/Spotify on the Touch Bar

Ever since I got my 2016 15″ MacBook Pro with Touch Bar, I wanted to have it show one thing: the currently playing track. Today, thanks to the amazing Better Touch Tool and some Apple Script (which I don’t like, but it gets the job done), I finally have that functionality.

It’s really easy:

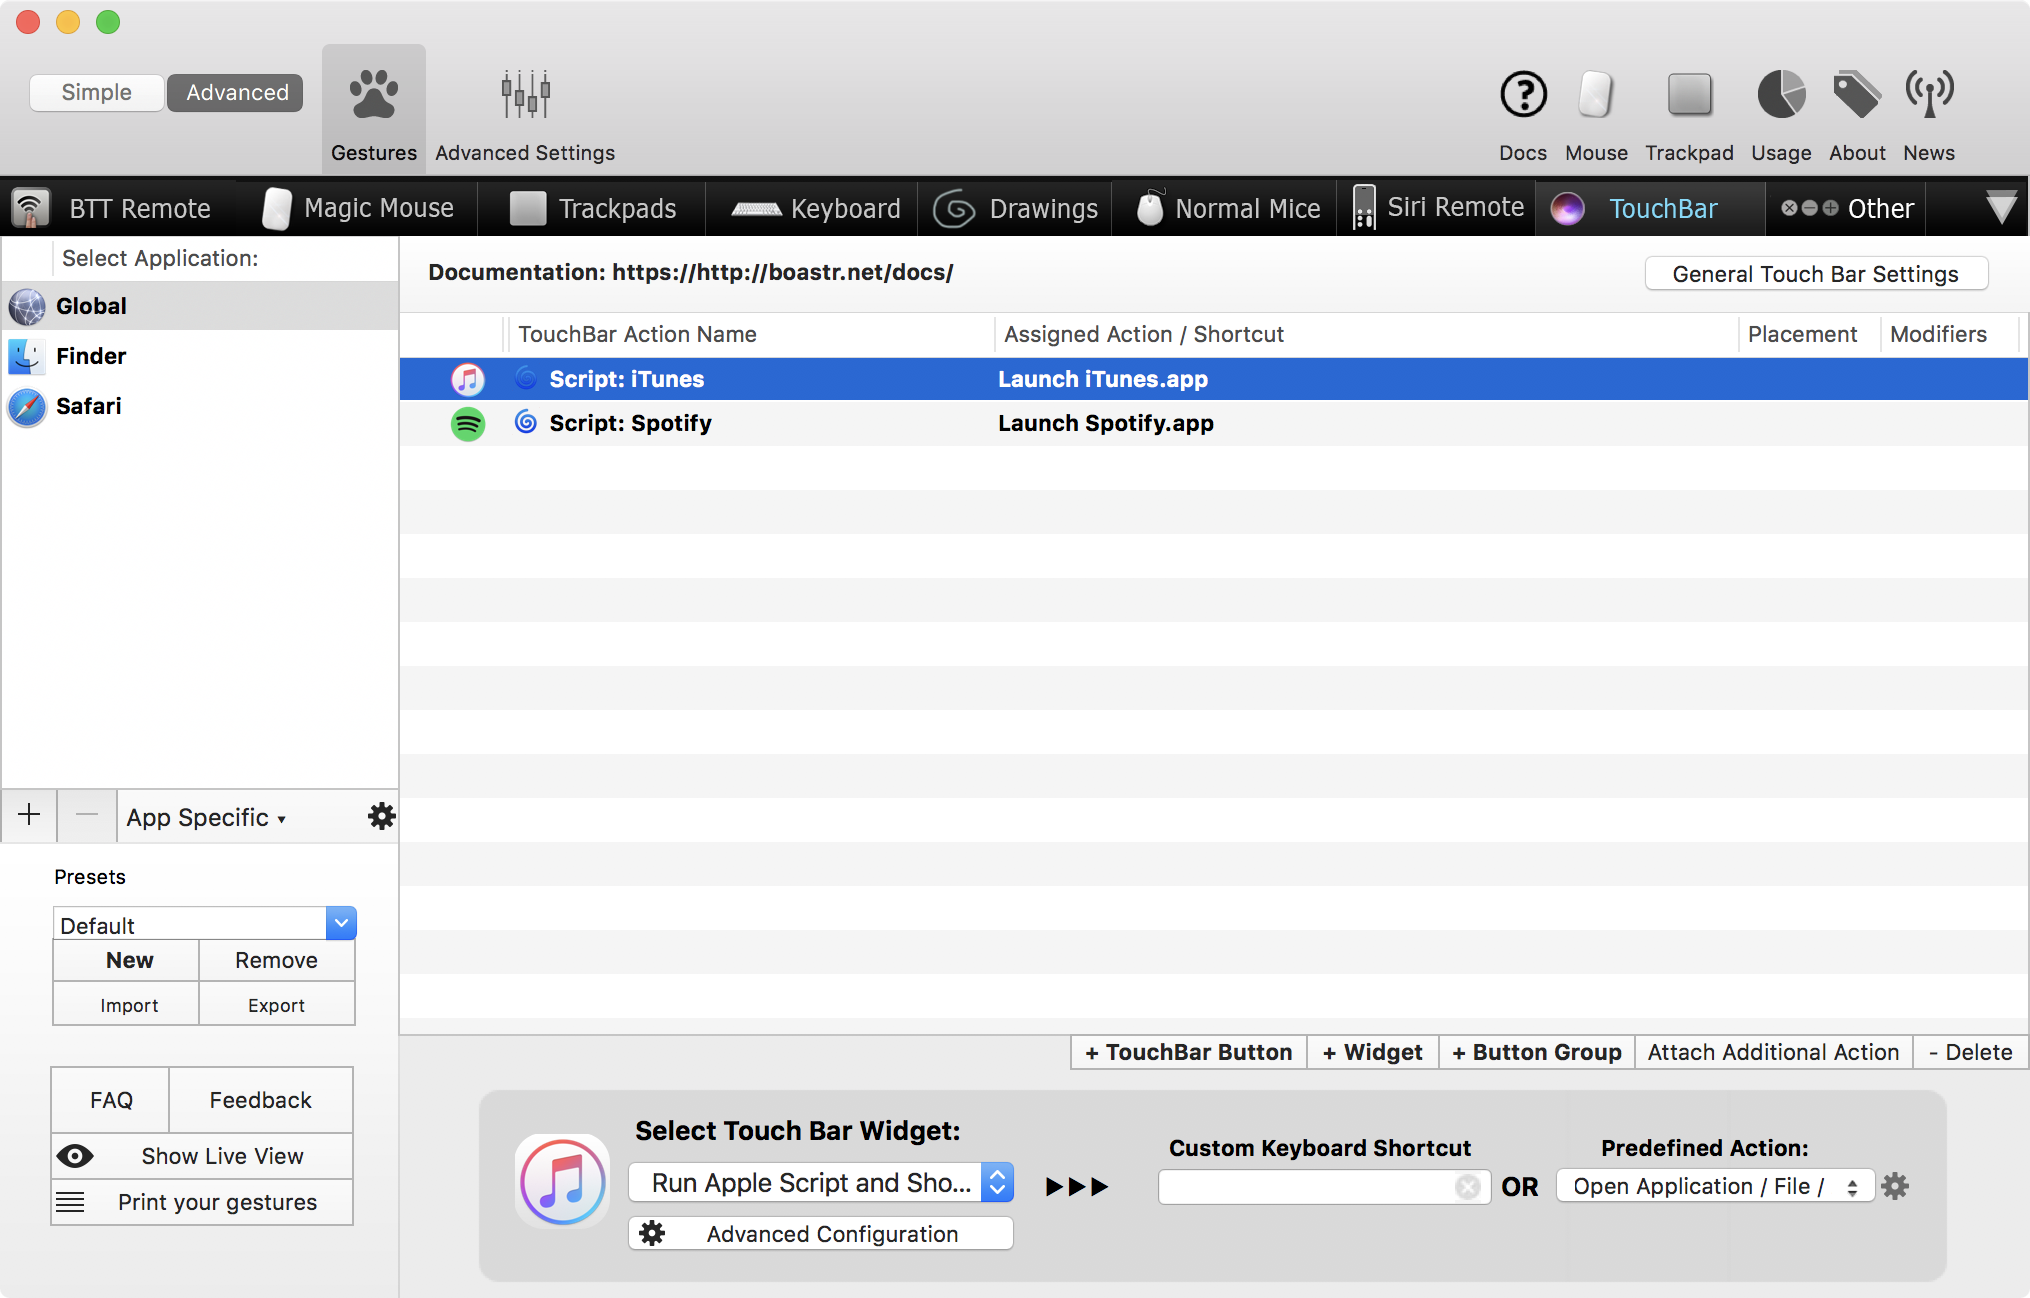
  1. Open Better Touch Tool and click on the Touch Bar section.
  2. Add a widget and select the “Run Apple Script and Show Return Value” option.
  3. Click on the “Advanced Configuration” button and paste the relevant Apple Script (see below).
  4. Optional: set the Predefined Action to “Open Application / File / Apple Script …” and select iTunes/Spotify: this will always bring iTunes/Spotiy to the foreground when you tap the widget.
  5. Optional: set the iTunes/Spotify icon as the widget’s icon (You can right click on the .app bundle, click on “Show Package Contents”, then go to Contents/Resources. The icones are respectively iTunes.icns and Icon.icns, just drag them over their spot in BTT.)

Here is the script for iTunes:

And here is the one for Spotiy:

The only difference between the two is the name of the app in the first if and in the tell statement.

Better Touch Tool hides the widget if the Apple Script returns nothing (which is the case when the music is paused or when the iTunes/Spotify are closed): you can work that around by replacing the two return "" with return " ", i.e. returning a space when nothing is playing. It’s not very aesthetically pleasing on the Touch Bar because the button is asymmetric, but you can do that if you prefer it that way.

Categories
Mac

Force standard RGB out over HDMI on macOS

I own a 27-inch Philips Brilliance 272C monitor, which features both DisplayPort and two HDMI ports, both supporting the full 1440p resolution at 60 Hz.
DisplayPort has always been literally plug-and-play, and I have always used it to connect the monitor to my Mac. In fact, it was the only way I could have get full resolution on my old 2010 15″ MacBook Pro.

Yep, that’s totally my desktop

Last year my brother got a 2015 13“ Retina MacBook Pro, and I noticed that when using HDMI to connect to the screen the image would be not nearly as good as over DisplayPort, colors were off and there was even some sort of ”ghost” of the current picture shifted a few pixels.

I finally decided to look for the cause of this and I narrowed it down to one thing: for some reason macOS thought the monitor was a TV (?) and it spit out a weird color mode instead of regular RGB, which resulted in the crappy image quality.

I got to this conclusion through Mathew Inkson’s great post on this matter, and ran the script by Andrew Dagherty he linked.
Basically the script generates an override file that needs to be placed into /System/Library/Displays/Contents/Resources/Overrides (which by the way requires you to disable SIP), which forces macOS to output the correct RGB color mode.

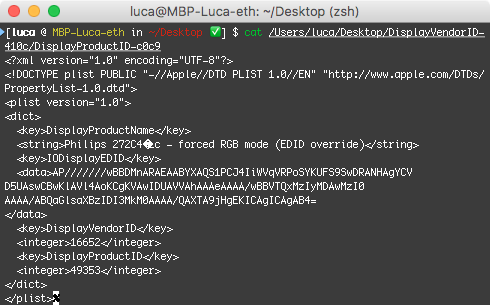
For some reason, though, it didn’t work for my monitor, it looked like the override never got loaded by macOS. Upon further inspection of the plist file generated by the script, I noticed that there were a weird character in the screen name, which made the whole file invalid (you can see it in the screenshot below).


I simply edited it and removed the garbage it spit there (definitely the screen’s fault, though, not the script’s), rebooted, et voilà, everything worked fine and the image was perfect both through DisplayPort and HDMI.

I can also confirm that the same workaround works perfectly with my shiny new 2016 15″ MacBook Pro through this cheap USB-C to HDMI adapter by VTIN.

If someone has the exact same monitor, I have uploaded the override files here. Just extract the DisplayVendorID-410c folder you find in the zip file to /System/Library/Displays/Contents/Resources/Overrides (again, you will have to temporarily disable SIP or proceed thorugh alternative methods to write at that path).

Categories
Mac

Check macOS installer build

My new 15″ MacBook Pro is coming this week, and due to multiple reports of units shipping with SIP (System Integrity Protection) disabled I wanted to play it safe and immediately wipe the new machine with a clean install of macOS from a thumbdrive. The question was, however: is the build of macOS currently on the Mac App Store the most recent one that supports the new MBPs (10.12.1 build 16B2657)?

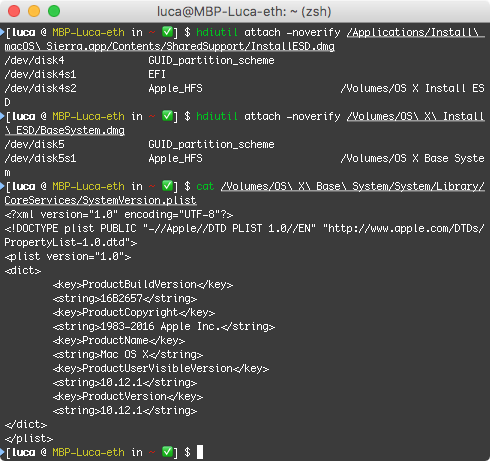
Screenshot of Terminal showing the commands to run

Finding out is not that easy, actually. First you’ll want to download macOS from the Mac App Store, then open the terminal and launch a few commands to mount the nested DMGs you donwloaded with the installer, and then check a plist file:

hdiutil attach /Applications/Install\ macOS\ Sierra.app/Contents/SharedSupport/InstallESD.dmg
hdiutil attach /Volumes/OS\ X\ Install\ ESD/BaseSystem.dmg
cat /Volumes/OS\ X\ Base\ System/System/Library/CoreServices/SystemVersion.plist

Just make sure paths are correct.

Attaching the DMGs might take a while, as they need to be verified first. You can skip the verification process by putting -noverify between attach and the file path.

You should get something like this:

<?xml version=“1.0” encoding=“UTF–8”?>
<!DOCTYPE plist PUBLIC “-//Apple//DTD PLIST 1.0//EN” “http://www.apple.com/DTDs/PropertyList–1.0.dtd”>
<plist version=“1.0”>
<dict>
 <key>ProductBuildVersion</key>
 <string>16B2657</string>
 <key>ProductCopyright</key>
 <string>1983–2016 Apple Inc.</string>
 <key>ProductName</key>
 <string>Mac OS X</string>
 <key>ProductUserVisibleVersion</key>
 <string>10.12.1</string>
 <key>ProductVersion</key>
 <string>10.12.1</string>
</dict>
</plist>

You can clearly see that ProductVersion is 10.12.1 and ProductBuildVersion is 16B2657.

Categories
Mac

Foscam Safari plugin and macOS Sierra, High Sierra and Mojave

foscam-logoI’ve had two Foscam security cameras (model FI9805W) for a few years, and I’ve been able to view their image and adjust their settings with no problems using the official plugin in Safari, which worked fine on Sierra too.
However, I recently purchased a third camera (model FI9828P V2), and its plugin didn’t work with macOS Sierra.

Thankfully, I stumbled upon a post in the Foscam forums that provided a working version of the plugin. I took the liberty of uploading to my blog as well, you can download it from here (here you can find an older version).

UPDATE for macOS High Sierra

The plugin still works with macOS High Sierra, but I found a newer version that works with more cameras, including the FI9851P V3 which I recently purchased.

UPDATE for Safari 12 and macOS Mojave

Foscam has published a new, different kind of plugin that works with Safari 12 and macOS Mojave. Newer firmwares for newer cameras link to this plugin (my FI9900EP does, for example) when trying to access their web UI from Safari. Their SSL certificate is broken but other than that the plugin installs and works just fine. Again, I’m mirroring the installer here for posterity.

Alternative solution for Safari 12 and macOS Mojave

Foscam’s VMS app works fine, is a native Mac app and seems to have most of the features the web UI had (for example PTZ controls on my FI9828P V2 seem to be missing/not functional, I’ll have to investigate further on that).

  1. Install the app
  2. Launch it
  3. Login as admin with no password
  4. Add your cameras
  5. Enjoy!

I took the liberty to mirror the app here on my blog, in case it should no longer be available from Foscam in the future.

Categories
Linux

Blocking access to DD-WRT’s web interface from guest network

Even though I’ve shifted all the routing functionality of my LAN to the excellent pfSense (and specifically to a PC Engines alix2d2, for the time being), DD-WRT still plays a role in my network, since it powers a couple of my access points.

ddwrt

One of its key features that I rely on is the ability to make two or more SSIDs available, bridging the wireless networks to different VLANs in order to separate them. I have a couple of them at the moment, but the main “secondary” network is the guest one.

On my guest network, I want to prevent any access to DD-WRT (such as the web interface, SSH management, and so on). AFAIK, there’s no graphical way to do so in the admin panel, so I resorted to a quick iptables rule.

iptables -I INPUT -i br1 -d <DD-WRT's IP on guest net here> -j DROP

Basically this tells the firewall to DROP every packet that comes in from the br1 interface (make sure it’s the correct one in your config) and that is destined to its IP address on that interface.

To save and apply this rule log into the web interface, go to Administration/Commands, paste the command above (make sure you’ve inserted the correct IP) and then click on the “Save Firewall” button. Done.

Note: with this rule DD-WRT will be unreachable from that VLAN/SSID, even to you, so you’ll always have to access it from the main VLAN/network.

Categories
Mac

Throttling iCloud’s upload: here is the IP subnet

TL;DR 54.231.0.0/16

For those of us with limited upload bandwidth, just plugging an iPhone in for a charge while on home wifi can bring our connection to its knees. As convenient as automatic online backups are, they tend to monopolize all the available bandwidth, and saturating your upload means crippling the download as well (it has to do with buffer bloat, delayed ACKs, and other stuff).

iCloudThrottle

Through some Google-fu I found (one of) the subnet(s) used by iCloud, so that I can easily throttle the upload traffic without imposing a limit on all the upload coming from iOS devices. The subnet is 54.231.0.0/16.

Thanks to my pfSense router, I put together a nifty set of rules that throttles uploads to that subnet from 8 am to midnight, limiting it to 50% of my available bandwidth. During the night, it is unlimited.

Just a quick overview of what’s needed to do that on pfSense (not a full tutorial, sorry):

  • A schedule that defines the times you want the limit to be enabled
  • Trafic shaping with a dedicated upload queue with a fixed maximum rate, in addidition the default ones
  • A floating rule of type Pass, applied on both WAN and LAN, TCP protocol, destination 54.231.0.0/16, active during the day, sent to the queue you created earlier w/ the limit enabled.

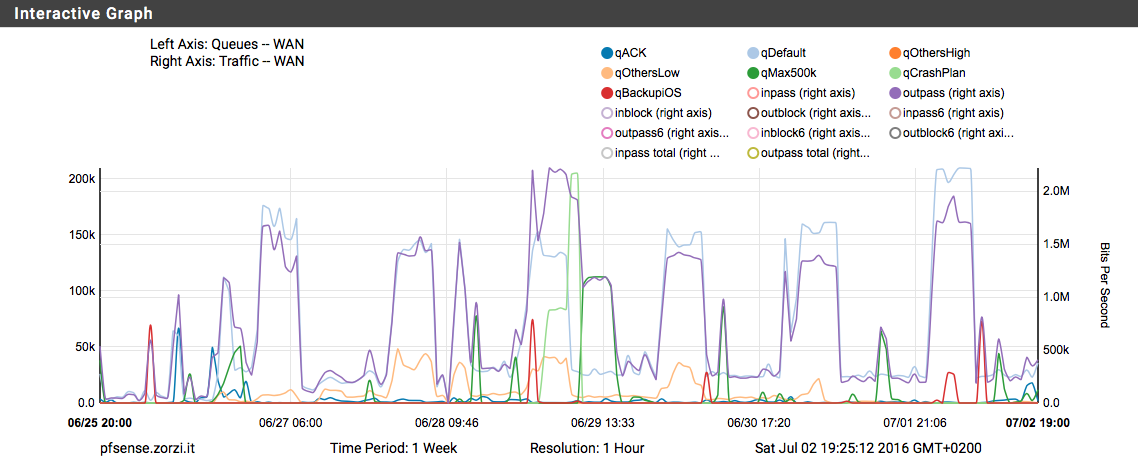
Actually I have 2 schedules, one for the day and the other for the night, an additional queue for unthrottled iCloud backups and an additional floating rule that is identical to the one above apart from the fact that it is enabled during the night and sends traffic to the unthrottled queue. This allows me to have nice graphs that show only iCloud traffic. Definitely not necessary, but cool.

pfSenseQueues