Categories
Mac

Get rid of the “Open from iCloud” window in Mavericks

Since the introduction of iCloud in many OS X apps in Mountain Lion, we’ve had to live with the pointless “Open from iCloud” window every time we launched these apps. I’m speaking mainly of TextEdit and Preview, but recently even more apps got this useful feature, such as Automator and AppleScript Editor.

iCloud for TextEdit - we all hate this.
This. We all hate this.

But last month Apple released Mavericks, which came to save us from this hell. It offers a great solution: the ability to enable/disable iCloud on a per-app basis, thus allowing us to only have it on apps that benefit from it (Pages and Byword, for example).

Without further ado, let’s go and kill iCloud for TextEdit & co.

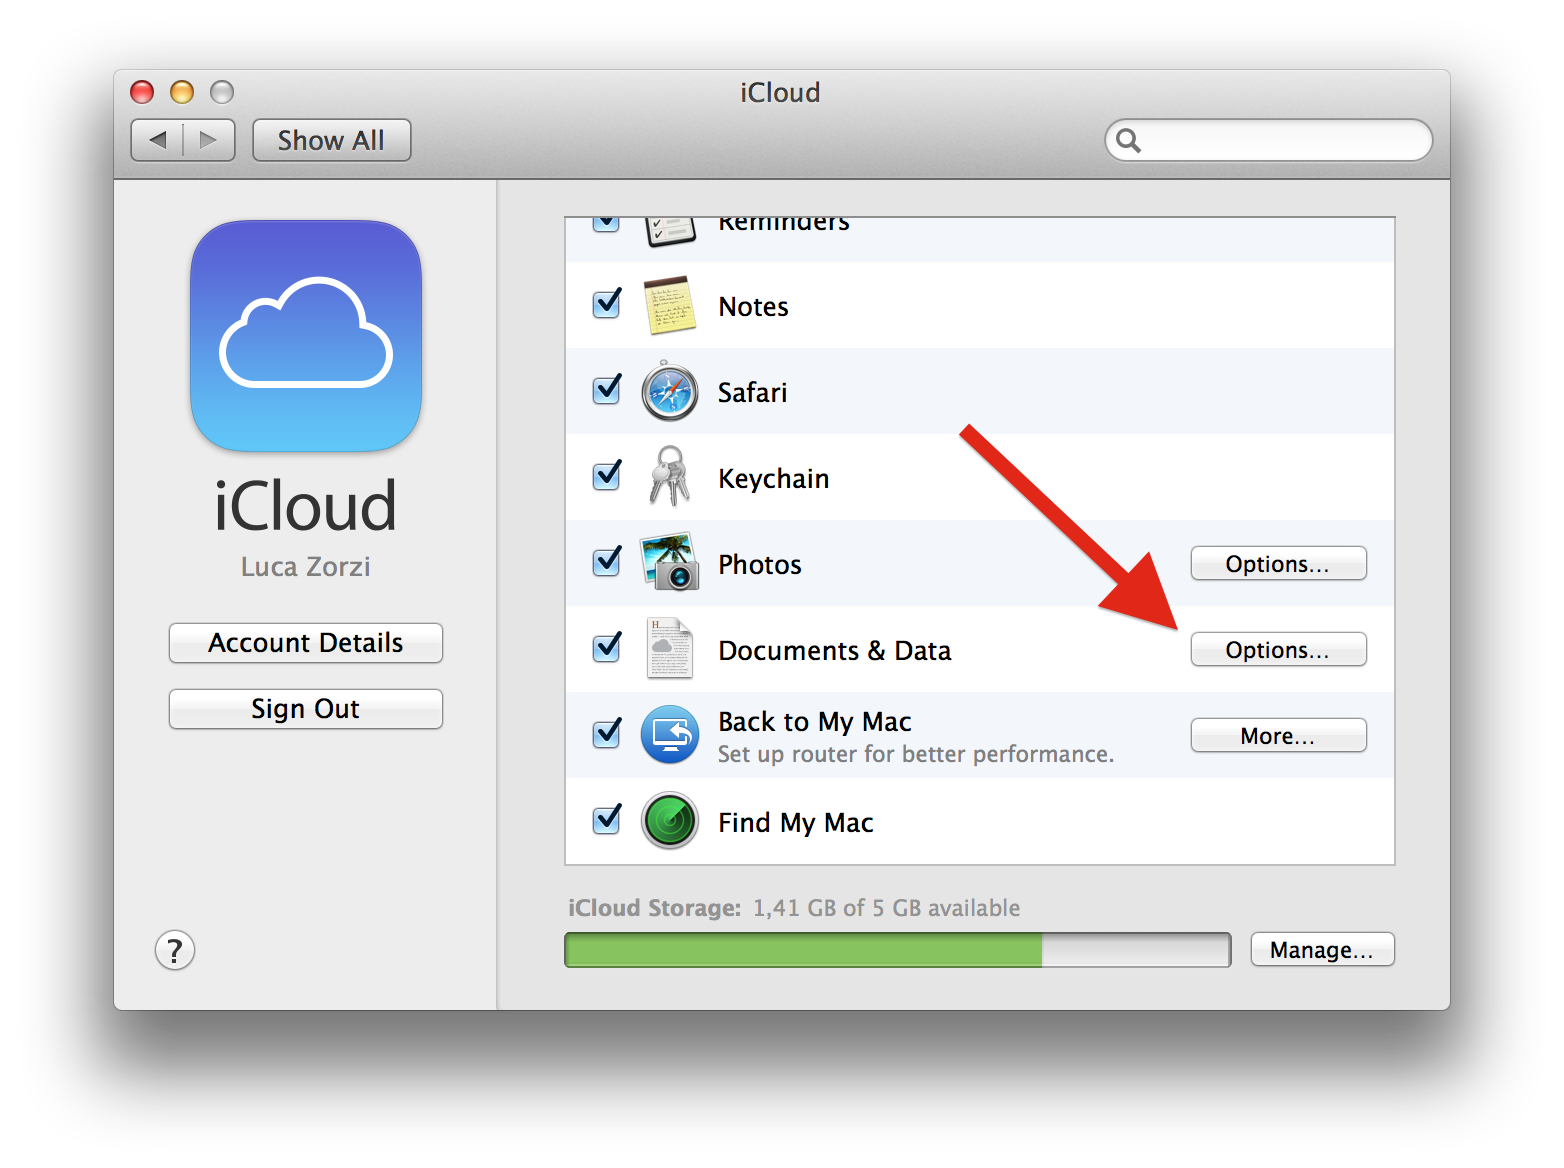
It’s pretty easy: just go to System Preferences/iCloud and click the “Options…” button next to “Documents & Data.

System Preferences/iCloud/Documents & Data/Options…
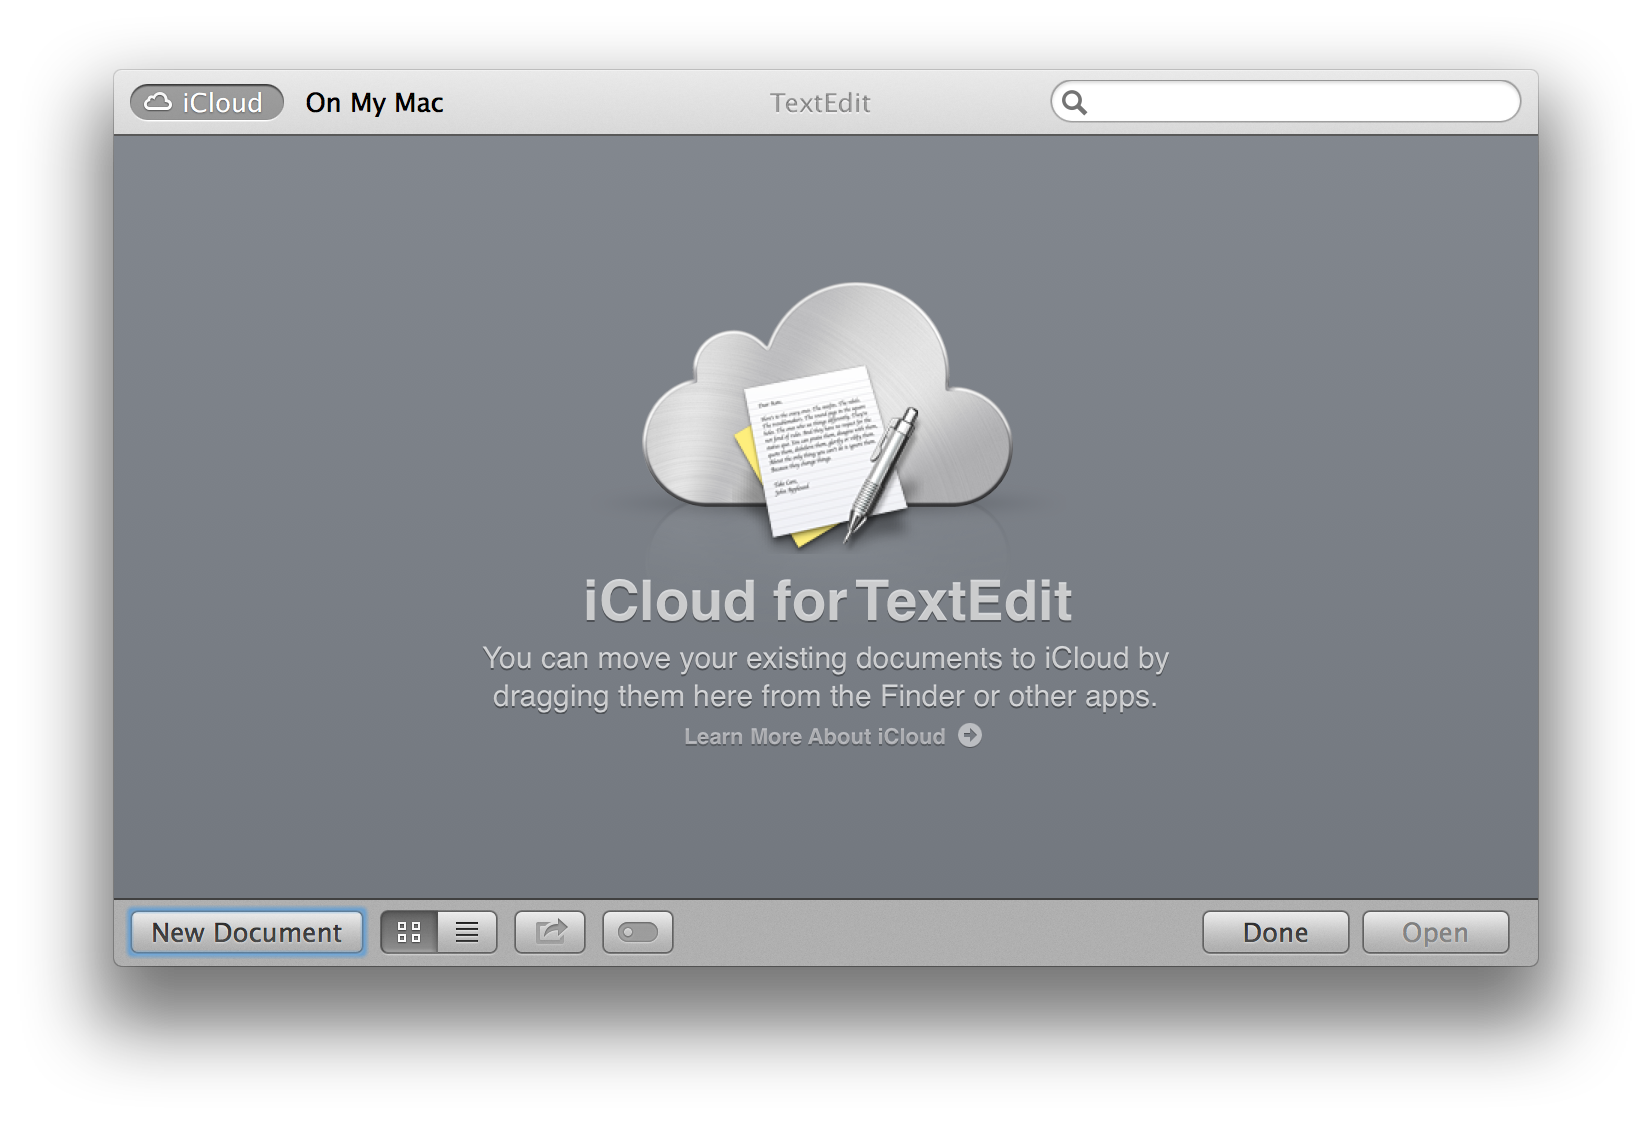
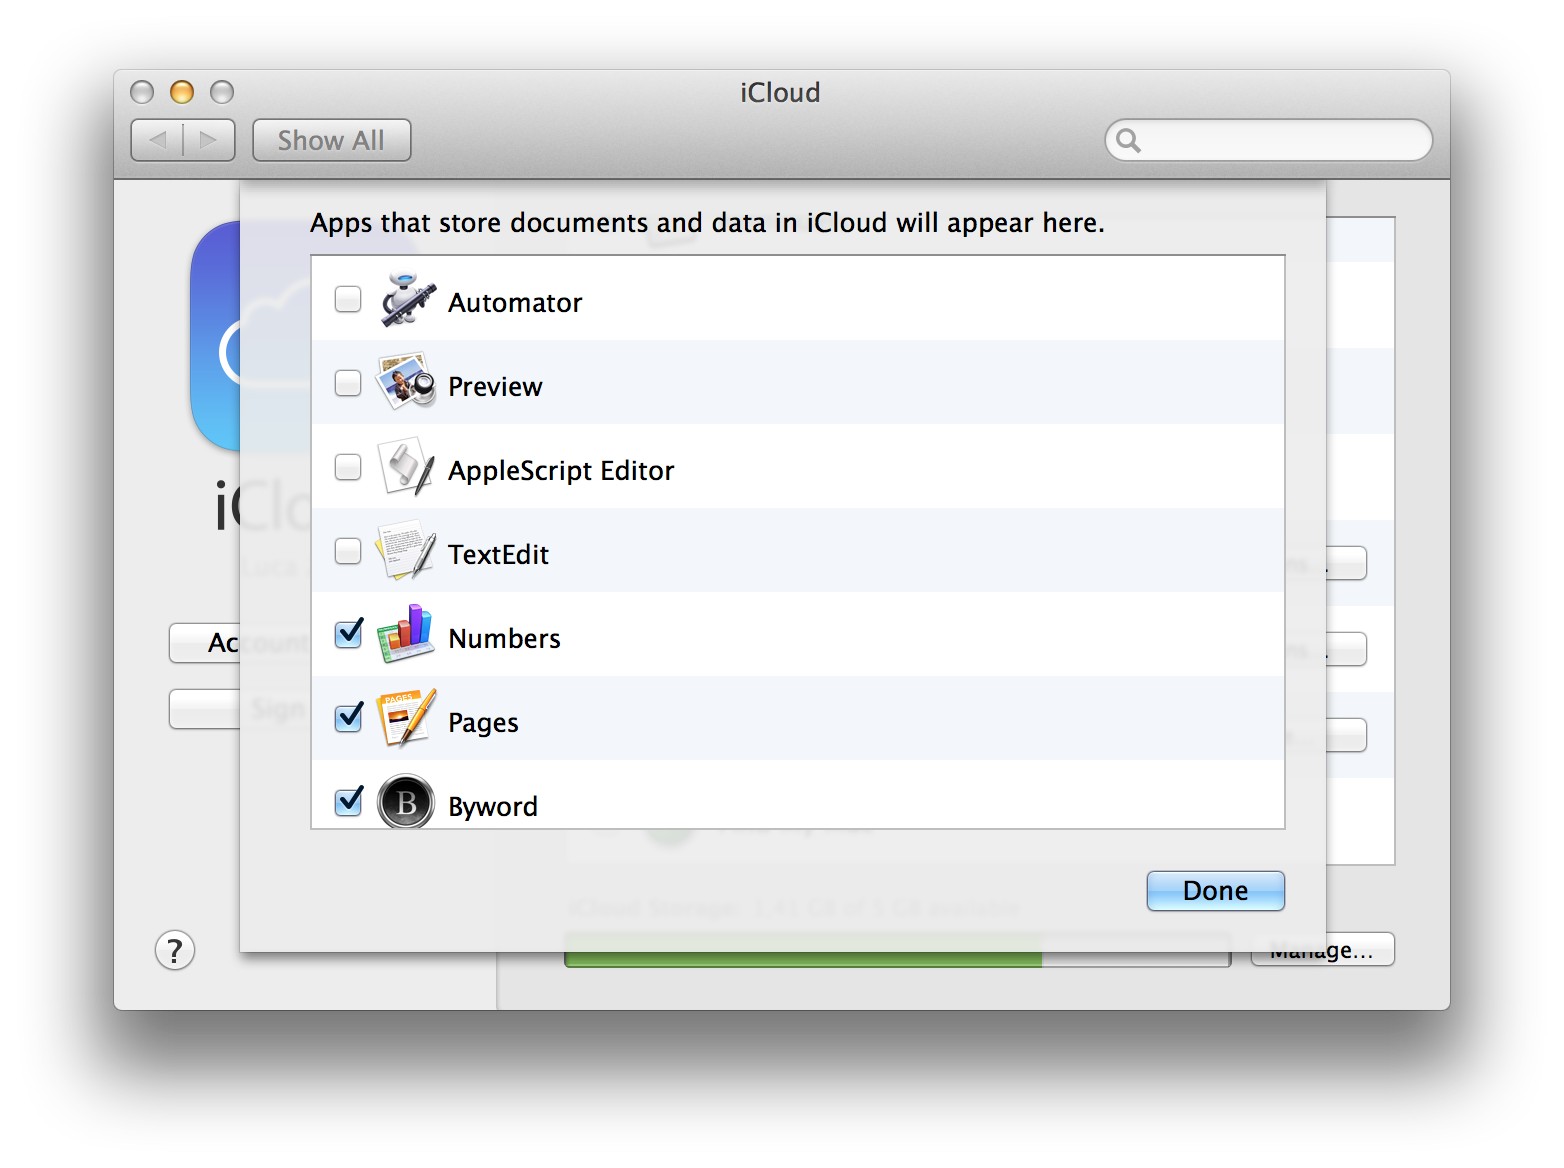
A nice popover will appear and it will let you chose the apps in which iCloud documents will be available. Deselect any apps you wish, and then click “Done”.

DIsable iCloud documents in unnecessay appsFreedom. Enjoy the sense of freedom that comes from your apps being iCloud-free again, like in the good ol’ days.

Now, the next time you open TextEdit, you will be greeted with a glorious empty document, ready to be filled with your awesome words.

TextEdit is now iCloud-free


Categories
Mac

Introducing SoundBlossomer

SoundBlossomer LogoA while back I wrote about my hack that allowed me to have multiple instances of Soundflower that I used to record a multi-track Skype group call for podcasting purposes. That guide became pretty popular, and it was even linked in Cycling 74’s blog.

Today I’m introducing a new project, SoundBlossomer, a little utility that lets you easily add, edit and delete your Soundflower audio interfaces.

Basically, this app figures out which Soundflower instances you already have defined in your /System/Library/Extensions/Soundflower.kext/Contents/Info.plist file and shows them in a list, allowing you to add additional ones, as well as renaming, changing the number of channels and deleting the other ones.

SoundBlossomer Screenshot

I spent about a day putting together this app, which by the way is my first Mac app ever, and I think it works reasonably well, at least in all the testing I’ve made. If you find any issues, please, let me know.

SoundBlossomer is 100% open source, it is released under the BSD license and you can find all of its source code on the GItHub page. I strongly encourage you to check it out, and even to improve it if you can, I’d gladly pull your changes into the main repository.

Categories
Mac

Take retina screenshots on non-retina Macs

A few minutes ago, I posted about using curl to inspect HTTP headers, and I included a screenshot of the terminal window. Then I opened the page on my Retina iPad: the screenshot looked awful, to say the least.

Retina display icon

So I googled a bit and found this awesome Gist by Simone Manganelli, that shows the commands needed to enable “HiDPI” modes on regular Macs. These modes use four pixels on the screen for each “logical” pixel, just like Retina screens do. This will of course greatly decrease the available screen real estate, but on my 2560×1440 27-inch monitor it’s not much of an issue, not for the time needed to take a screenshot, at least.

The first command will make these mode available for selection from System Preferences/Display, the second will remove them. Note that you need to log out and then back in after issuing the first command to see the newly added resolutions.

Using this trick I was able to capture a much higher res screenshot, that definitely looks better on Retina screens.

Categories
Linux Mac

Check the headers sent by a web server using curl

If you ever wanted to easily and quickly check the headers sent by any web server you can do it with curl. It comes preinstalled in OS X as well as in many Linux distributions, and it makes this operation really straightforward.

Curl in action showing HTTP headers

Just launch

curl -I http://somesite.com/

and you’ll get every response header sent by the site. Easy, huh?

Categories
Linux Mac

Use .rev files from the command line

Sometimes, when you download a big multi-part rar file, a part gets corrupted, or it is not even available. Often, however, .rev files are made available, and they’ll let you extract the file even with missing/corrupted parts. In fact, they let you re-create these parts, in a way similar to RAID-5/6 for hard disks.

Rar files

You can use the command line rar tool to do all the job. First, head over to rarlab, the official site, and download the appropriate version for your OS.

On Linux and OS X, you might want to move the binaries into your path, for example into /usr/bin.

Then, cd into the directory where your parts reside (together with .rev files, you need one for each damaged part you wish to recover), and launch:

rar rc yourfile-part01.rar

The rc switch tells rar to ReConstruct any missing parts (I’d advise you to move somewhere else or delete any damaged parts). Point it to part number 1, it’ll figure out the rest. The process can be quite long, more so for big archives, but it’s worth waiting. After it’s done, you can extract your files as usual, or directly using the command line:

rar x yourfile-part01.rar
Categories
Mac

Improve software RAID speeds on Linux

About a week ago I rebuilt my Debian-based home server, finally replacing an old Pentium 4 PC with a more modern system (which has onboard SATA ports and gigabit ethernet, what an improvement!). It’s based on an Asrock B75 Pro-3M motherboard, an Ivy Bridge Pentium G2020 processor and 4 gigs of RAM.

Storage Server

I migrated all the drives I had in the old server, including the boot drive, so I didn’t have to configure much. The server has a 200 gb IDE boot drive (connected via a 5€ IDE-SATA converter I got off eBay) and 3×2 Tb WD20EARS 2 Tb “Green” drives configured in RAID-5.

Read speed was finally able to almost saturate my gigabit ethernet, but write speed was still disappointingly slow: about 35-40 megabytes/s via AFP and around 65 mb/s directly on the server.

Categories
Mac

How to fix coreaudiod 100% CPU usage

Today, when I booted my Mac I noticed it was really unresponsive, and the fans immediately started going up like crazy. Through Activity monitor, I found the cause for this: coreaudiod was using 100% of my CPU. And force quit did not help.

core_audio_by_rob190975Core Audio is the framework that manages audio on OS X, and it’s awesome, except when it suddenly decides to go crazy and suck all my CPU.

After some googling, I found this post by Axel Jensen, and it literally saved my day.

Basically, for some unknown reason, my /Library/Preferences/Audio/ folder had disappeared, and that really angered coreaudiod. As Axel found, the solution is pretty simple: recreate the folder and set the correct permissions, with just two terminal commands.

sudo mkdir /Library/Preferences/Audio
sudo chown -R _coreaudiod:admin /Library/Preferences/Audio

I did some additional research and found out that it’s also safe to restore that folder from a Time Machine backup, or any other backup really, just make sure to set the proper permissions with the second command above. This way I was able to get my aggregated audio interfaces back, and I did not have to re-create them in Audio MIDI Setup.

Categories
Mac

Some useful Alfred 2 workflows

Today I finally bought Alfred 2, a really nice update. It’s great, but I had to recreate some scripts I got used to while using version 1. You can find them below.

Alfred


CopyPath

CopyPath copies the path of the currently selected Finder Item to the clipboard. Just launch Alfred and type “path”. Also, thanks to Joachim’s suggestion, you can now set a keyboard shortcut to trigger the workflow without needing to ever launch Alfred.

Copy IP

Copy IP your current local IP, either Wi-Fi or Ethernet. It includes 3 commands:

  • ethip copies your Ethernet IP
  • wifiip copies your Wi-Fi IP
  • ip [interface] copies interfaces IP. It’s meant for power users. Note: on Macs usually en0 is the Ethernet interface, while en1 is Wi-Fi.

RevMove

RevMove checks your clipboard contents and removes any line containing “.rev”. It is useful if you download from file-hosting sites, such as Netload, because uploaders often include .rev files to their upload to be able to extract your files also some parts were corrupted/not available. But when everything works as it should, these files are pointless and waste time and bandwidth to be download.

MAS Search

MAS Search lets you search for an app in the Mac App Store. Just type mas followed by your search terms.


If these are not enough, you can find many, many more in the Alfred 2 Workflow list, which also features my very own CopyPath.

Categories
Mac

Can’t save to Pocket/Instapaper from Tweetbot after changing password

TweetbotPocketInstapaperAfter changing my Pocket password, I could not save any more links from Tweetbot for Mac, not even if I entered the correct password. I have found a solution, though.

The issue is due to a corrupt entry in the keychain, and solving the issue is pretty simple.

First, close Tweetbot and then open the Keychain Access app from your Applications/Utilities folder (a Spotlight search will quickly find it), and type tweetbot in the search field.

Keychain ScreenshotYou will find all of your Tweetbot-related stuff, such as Twitter tokens and, what’s more important, Pocket and/or Instapaper passwords. Just highlight the relevant entry and hit the backspace key. Now you can re-open Tweetbot and re-enter your credentials.


Categories
Mac

Record multi-track Skype group call on OS X

A friend of mine and I host a weekly podcast and, as it often happens, we speak with our guests via Skype. For a while we had everyone record his own audio, since we wanted to have a separate track for each person in order to get the best possible audio quality. But that was inconvenient, both for our guest and for us, as we had to wait everyone to send us his audio before mixing and editing the episode. Recording Skype’s group call in a conventional way wasn’t a better solution. We’d only have two separate tracks: mine and everybody else’s, This is fine if there is only one person other than me, but it’s not with more guests.
So I started to think on possible solutions, and the best one that came to my mind was to have a separate instance of Skype running for each guest (I’ll explain how to do this later on) and use Ableton Live to record each track and to manage the audio routing.

Ableton Live is quite expensive, though, and if you don’t already have some experience with it that justifies purchasing a license, I’d advise you to check out snkl’s post that explains in detail how to achieve the same result with a much cheaper (but still great) app: Rogue Amoeba’s Audio Hijack 3.

My awesome hand-drawn scheme

To manage the audio, we need some sort of virtual audio cables to connect Skype to Ableton Live. The best tool is SoundFlower, so head over to their site, download and install it. However, it is not ready for our purpose right out of the box: we need 2 “virtual audio cables” for each Skype instance, and Soundflower only ships with 2 of them enabled by default (and only one of which, the 2 channel one, is suited for our needs). I managed to edit Soundflower’s plist file to get more.