Categories
FreeBSD Linux

Improve FreeNAS NFS performance when used with Proxmox

TL;DR: zfs set sync=disabled your/proxmox/dataset

Lately I’ve been playing around with Proxmox installed on an Intel NUC (the cleverly named NUC6CAYH, to be precise), and I must say it is really, really, cool.

I usually store my containers and VMs on the local 180 GB SSD that used to be in my old MacBook Pro, since it’s reasonably fast and it works well, but I wanted to experiment with NFS-backed storage off my FreeNAS box (4x4TB WD Reds in RAIDZ1, 16 GBs of RAM, an i5–3330 processor).

Frankly, I was pretty unsatisfied with the performance I was getting. Everything felt pretty slow, especially compared to the internal SSD and, surprisingly, to storing the same data on a little WD MyCloud (yes, the one with the handy built-in backdoor).

My very unscientific test was creating a fresh container based on Ubuntu 16.04, and upgrading the stock packages that came with it. As of today, it meant installing around 95 MB’s worth of packages, and a fair bit of I/O to get everything installed.

The task was completed in around 1’30″ with the container on the internal SSD, 2’10″ on the WD MyCloud, and an embarassing 7’15″ on the FreeNAS box.

After a bit of googling, I came to an easy solution: set the sync property of the ZFS dataset used by Proxmox to disabled (it is set to standard by default).

The complete command is zfs set sync=disabled your/proxmox/dataset (run that on FreeNAS as root or using sudo).

To be honest, I don’t really know the data-integrity implications of this flag: both machines and the switch between them are protected from power failures by two UPSs, so that shouldn’t be much of an issue.

Anyway, just changing that little flag signlificantly reduced the time required to complete my “benchmark”, bringing it down to around 1’40″, very close to Proxmox’s internal SSD. Again, at the moment I don’t really need to run VMs/CTs off the FreeNAS storage, but it is good to know that it is possible to achieve much faster performance with this little tweak.
Categories
Linux

Blocking access to DD-WRT’s web interface from guest network

Even though I’ve shifted all the routing functionality of my LAN to the excellent pfSense (and specifically to a PC Engines alix2d2, for the time being), DD-WRT still plays a role in my network, since it powers a couple of my access points.

ddwrt

One of its key features that I rely on is the ability to make two or more SSIDs available, bridging the wireless networks to different VLANs in order to separate them. I have a couple of them at the moment, but the main “secondary” network is the guest one.

On my guest network, I want to prevent any access to DD-WRT (such as the web interface, SSH management, and so on). AFAIK, there’s no graphical way to do so in the admin panel, so I resorted to a quick iptables rule.

iptables -I INPUT -i br1 -d <DD-WRT's IP on guest net here> -j DROP

Basically this tells the firewall to DROP every packet that comes in from the br1 interface (make sure it’s the correct one in your config) and that is destined to its IP address on that interface.

To save and apply this rule log into the web interface, go to Administration/Commands, paste the command above (make sure you’ve inserted the correct IP) and then click on the “Save Firewall” button. Done.

Note: with this rule DD-WRT will be unreachable from that VLAN/SSID, even to you, so you’ll always have to access it from the main VLAN/network.

Categories
Mac

Throttling iCloud’s upload: here is the IP subnet

TL;DR 54.231.0.0/16

For those of us with limited upload bandwidth, just plugging an iPhone in for a charge while on home wifi can bring our connection to its knees. As convenient as automatic online backups are, they tend to monopolize all the available bandwidth, and saturating your upload means crippling the download as well (it has to do with buffer bloat, delayed ACKs, and other stuff).

iCloudThrottle

Through some Google-fu I found (one of) the subnet(s) used by iCloud, so that I can easily throttle the upload traffic without imposing a limit on all the upload coming from iOS devices. The subnet is 54.231.0.0/16.

Thanks to my pfSense router, I put together a nifty set of rules that throttles uploads to that subnet from 8 am to midnight, limiting it to 50% of my available bandwidth. During the night, it is unlimited.

Just a quick overview of what’s needed to do that on pfSense (not a full tutorial, sorry):

  • A schedule that defines the times you want the limit to be enabled
  • Trafic shaping with a dedicated upload queue with a fixed maximum rate, in addidition the default ones
  • A floating rule of type Pass, applied on both WAN and LAN, TCP protocol, destination 54.231.0.0/16, active during the day, sent to the queue you created earlier w/ the limit enabled.

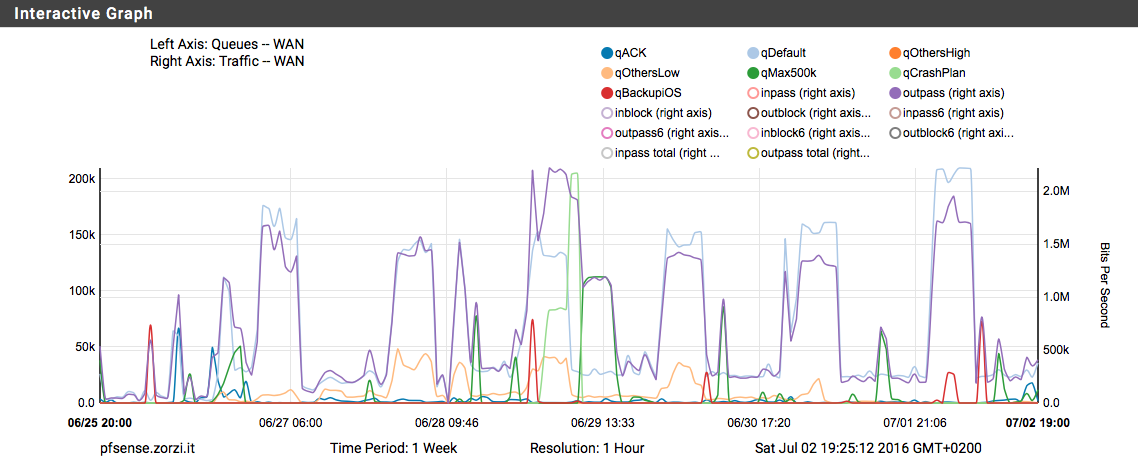
Actually I have 2 schedules, one for the day and the other for the night, an additional queue for unthrottled iCloud backups and an additional floating rule that is identical to the one above apart from the fact that it is enabled during the night and sends traffic to the unthrottled queue. This allows me to have nice graphs that show only iCloud traffic. Definitely not necessary, but cool.

pfSenseQueues

Categories
Mac

Enable Guest Network on AirPort Basestations in Bridge Mode

TL;DR AirPort Basestations in Bridge Mode support the creation of Guest Networks, and all their traffic gets sent to VLAN 1003 on the Ethernet side.

I have a couple 5th-gen Apple AirPort Extreme Basestations in my house that I use to provide wifi access, together with a couple cheap TP-Link TL-WR841ND flashed with DD-WRT, and I run them all in bridge mode, as I don’t need their routing capablities. I rely on my PC-Engines Alix 2d2 running pfSense to be my router, so I just need wifi access points, not full-blown wireless routers.

One nice feature that you get if you do run AirPort Basestations as routers is the ability to have a completely isolated wifi network for guest use, that gets internet access but does not allow communication with devices on your private LAN.

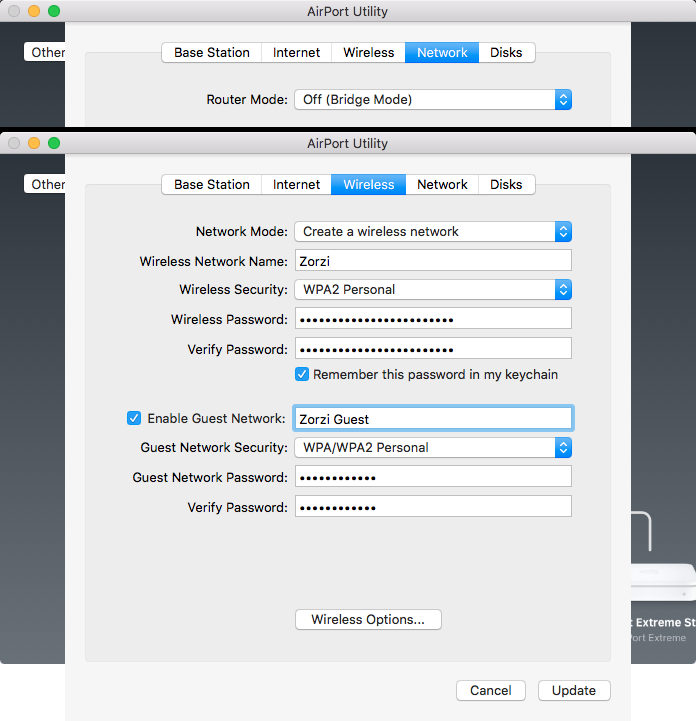
Due to what I think is a bug in AirPort Utility, you can enable the guest network even when running your AirPort in bridge mode, the network is created and you can connect to it, but it looks like it doesn’t work: you don’t get an IP through DHCP, and any traffic seems to end nowhere.

After some Googling and Wiresharking, I found out that what actually happens is that AirPorts funnel all the guest network traffic to VLAN 1003, so if you have network equipment that is able to deal with VLANs you can actually use both Bridge Mode and Guest Network at the same time.

Luckily enough, my pfSense-based router is more than capable to do that, so I set up a Guest Interface on VLAN 1003, configured the DHCP server to assign addresses on that interface (on 10.10.10.0/24, while my main LAN runs on 192.168.1.0/24) and set up firewall rules to only allow traffic to the internet, and not to my LAN or other local subnets (such as my VPNs, and a second LAN I run on a different VLAN).

Categories
Linux

Avoid stuttering streaming from NFS shares with XBMC on the Raspberry Pi

I’ve been using my Raspberry Pi with XBMC (using the awesome Raspbmc distro) for a while now, I even control it using my CEC-Compatible HDTV’s remote, but I pretty much always experienced stuttering while playing 1080p videos streaming from my home server, which was mounted on the Pi via NFS (directly through its /etc/fstab).Raspberry XBMCI dismissed the issue telling myself “it’s just not powerful enough”. But that’s not really the case. Not always, at least.

A little background

The Pi has an onboard GPU capable of decoding 1080p H.264 video, but it has no hardware acceleration for audio, which often leads to issues. DTS and AC3 often are difficult beasts for the board’s underpowered processor, unless you have a TV which is capable of decoding them on its own, in which case you just have to enable DTS/AC3 passthrough in XBMC’s settings.

If you quickly google “raspberry xbmc stutter”, audio tracks are often mentioned as responsible for poor playback, and it usually helps to play stereo versions of the movie sound track, if available. I convert all my movies (which generally come in the form of MKV files) using iFlicks, in order to make them iTunes and iOS-friendly. It always creates an AAC-encoded stereo track for each language, so it’s always available to help the poor ARM chip.

A solution (for me)

Still, my 1080p files stuttered, while 720p played flawlessly. Just for the sake of curiosity, I tried copying one of these movies to an USB thumbdrive, and I attached it directly to the Raspberry Pi. To my surprise, it played smoothly.

I also noticed that playing the same file over HTTP (I also have a web server running on my home server), was just as good.

So it looked like NFS was the one causing troubles. I posted on STM Labs’ (the makers of Raspbmc) forum, and I was told to try to play around with NFS mount options in my /etc/fstab, since I was probably getting an insufficient throughput that caused stuttering. Well, that did the trick. After some trial and error, here is my “magic” line that gives me a great 11,7 Mb/s speed reading files from my NAS (that’s very close to the physical limit of the Pi’s 100 Mbit port, which is more than enough even for 1:1 BluRay rips).

192.168.1.77:/multimedia /thor nfs udp,noatime,rsize=32768,wsize=32768,nolock,nfsvers=3 0 0

You’ll have to adjust your server address, path and mount point, but the mount parameters will likely work for you as well.

OpenElec

UPDATE: Andrew T suggested a better way to configure OpenELEC to mount NFS shares at boot, you will find it in the comments below this post.

As MartinP pointed out in the comments, due to OpenElec’s root filesystem being mounted read-only, editing /etc/fstab isn’t possibile.

However, it is possibile to edit /storage/.config/autostart.sh to run the mount command at boot. As an example, you can edit it like this:

#!/bin/sh
sleep 25
mount -t nfs 192.168.1.77:/multimedia /thor -o udp,noatime,rsize=32768,wsize=32768,nolock,nfsvers=3

As noted for /etc/fstab, adjust the server IP, share name and mount point as needed.