Categories
FreeBSD Linux Mac

BASH: Capturing both the output and the exit code of a process

Of course I found an answer to this in a collection of Stack Overflow questions, but to make things easier for anybody who might stumble into this post (and mainly for Future Me), here’s the answer.

Seriously, don’t do this.

Basically I have a command that sometimes produces an error, but usually just re-running it produces the correct output. When it encounters an error, it dutifully sets its error code to something other than 0 (success). But how to I capture both the command’s output and its exit code? This way.

output=$(myCommandWhichSometimesDoesntWork)
exit_code=$? # This HAS to be exeuted right after the command above

So I made a little wrapper script that repeatedly calls the first one until it gets an answer, with a set maximum number of retries to avoid infinite loops.

#!/bin/bash
retries=0
max_retries=10 # Change this appropriately
 
# The "2> /dev/null" silences stderr redirecting it to /dev/null
# The command must be first executed outside of the while loop:
# bash does not have a do...while construct
output=$(myCommandWhichSometimesDoesntWork 2> /dev/null)
while [[ $? -gt 0 ]]
do
        ((retries++))
        if [[ retries -gt max_retries ]]
        then
                exit 1
        fi
 
        output=$(myCommandWhichSometimesDoesntWork 2> /dev/null)
done
 
echo $output
Categories
FreeBSD Linux

Improve FreeNAS NFS performance when used with Proxmox

TL;DR: zfs set sync=disabled your/proxmox/dataset

Lately I’ve been playing around with Proxmox installed on an Intel NUC (the cleverly named NUC6CAYH, to be precise), and I must say it is really, really, cool.

I usually store my containers and VMs on the local 180 GB SSD that used to be in my old MacBook Pro, since it’s reasonably fast and it works well, but I wanted to experiment with NFS-backed storage off my FreeNAS box (4x4TB WD Reds in RAIDZ1, 16 GBs of RAM, an i5–3330 processor).

Frankly, I was pretty unsatisfied with the performance I was getting. Everything felt pretty slow, especially compared to the internal SSD and, surprisingly, to storing the same data on a little WD MyCloud (yes, the one with the handy built-in backdoor).

My very unscientific test was creating a fresh container based on Ubuntu 16.04, and upgrading the stock packages that came with it. As of today, it meant installing around 95 MB’s worth of packages, and a fair bit of I/O to get everything installed.

The task was completed in around 1’30″ with the container on the internal SSD, 2’10″ on the WD MyCloud, and an embarassing 7’15″ on the FreeNAS box.

After a bit of googling, I came to an easy solution: set the sync property of the ZFS dataset used by Proxmox to disabled (it is set to standard by default).

The complete command is zfs set sync=disabled your/proxmox/dataset (run that on FreeNAS as root or using sudo).

To be honest, I don’t really know the data-integrity implications of this flag: both machines and the switch between them are protected from power failures by two UPSs, so that shouldn’t be much of an issue.

Anyway, just changing that little flag signlificantly reduced the time required to complete my “benchmark”, bringing it down to around 1’40″, very close to Proxmox’s internal SSD. Again, at the moment I don’t really need to run VMs/CTs off the FreeNAS storage, but it is good to know that it is possible to achieve much faster performance with this little tweak.

Categories
FreeBSD

How to use a USB drive with FreeNAS

First of all, a disclaimer: I use this setup just as a secondary backup, I do not recommend you rely on USB drives as storage media for your FreeNAS server.

Overview

I have a few spare 2 TB drives that used to be in my homeserver, and I wanted to connect them to my FreeNAS every few weeks to store some backups on them, then disconnect them and put them in a drawer.

Preparing the USB hard drive

If your drives are not brand new, chances are you already have some data on them, so you’ll need to wipe them first. To do so, connect your drives to FreeNAS, login to the webinterface, go to the Storage tab, click on “View Disks”, select the correct one from the list, then click on the “Wipe” button on the bottom of the screen.

Everything will turn red now. That’s because you’re doing something potentially dangerous. Make sure you really select the correct drive, otherwise you might destroy all of your data.
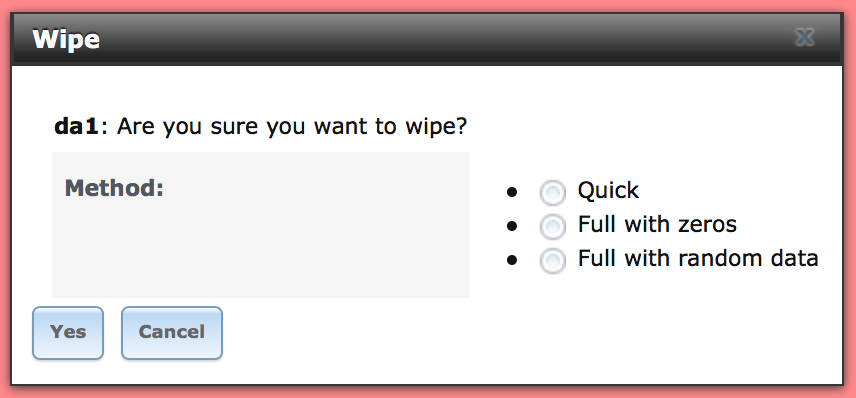
A Quick wipe is usually enough. Select that and proceed.

Once the wipe is completed, you can turn the disk into a Volume you can use on FreeNAS, just like your main one(s). Head over to the Storage tab, click on the “Volume Manager” button. You will see your newly wiped disk there, give it a volume name, tick the “Encryption” checkbox if you’d like, then click on “Add Volume”. I’ll call mine “ColdStorage” for the purpose of this tutorial.

Do NOT select any “Volume to extend”. That would mean you’d be adding a single (USB!) hard drive striped to your main pool, and that drive would become the single point of failure for all the data in that pool.

After the disk has been initialized, you can start adding datasets, clone other ones, setup network sharing, whatever.

Disconnecting the USB drive

Once you’re done with it, you will want to disconnect your USB drive to store it somewhere. To do so, once again go to the Storage Tab, select your pool from the list (ColdStorage in this example), then click on the “Detach Volume” button. You will only see this button if you select the pool, while if you select the dataset with the same name you will get a different set of buttons.

I’m not sure that I have to point that out, but let’s do it anyway: do NOT select “Mark the disks as new (destroy data)”. Once the pool has been detached, you can disconnect the USB drive.

Reconnecting the USB drive

For the thousandth time, go back to your trusty Storage tab, then click on the “Import Volume” button. A box will appear, select wether you have an encrypted volume or not, then click OK. FreeNAS will stop a few seconds to reflect on the good it’s made in its life, then it will present you a dropdown from which you’ll be able to select your USB volume. Click OK and it will be once again available in FreeNAS.

Categories
FreeBSD

ARP moved messages in FreeNAS/pfSense explained

kernel: arp: x.x.x.x moved from xx:xx:xx:xx:xx:xx to xx:xx:xx:xx:xx:xx on em0

Ever since adding a pfSense router and a FreeNAS box to my network, I noticed quite a few ARP moved messages in my system logs, and I finally found out what causes them.

TL;DR: Nothing to worry about.

Long(ish) version

First a little background. ARP messages are excahanged in ethernet networks (even wireless ones) in order to keep track to which physical (MAC) address each IP belongs to, so especially if you have static IP addresses or static leases in your DHCP server, you shouldn’t be seeing messages like these, which indicate that a given address is now assigned to a different device, hence the change of the MAC address.

I had noticed a couple interesting things about these MAC addresses: they all belong to Apple devices (you can check by entering the first three 2-character blocks in a lookup service), and one of tham always belonged to a Mac. The other one belonged to an AirPort base station (either an Extreme or an Express), which initially made me worry that somehow my Wi-Fi network was breached and somebody was connecting to it and stealing an IP. Actually it didn’t make much sense, unless the AirPort itself was hacked and used as a sort of relay.

After some googling, I came to this post on the FreeNAS forums where they explained that this behavior is due to a feature of AirPort base stations called sleep proxy.

Basically, when a Mac goes to sleep, its Bonjour-advertiesd services would disappear, making it no longer visibile on the network. AirPort base stations understand Bonjour, and they get notified when a Mac goes to sleep, so they start broadcasting the Mac’s services (file sharing, screen sharing, SSH, etc.) and “grab” its IP. This way, when somebody tries to access one of these services, either because they already knew the sleeping Mac’s IP or because they discovered it through Bonjour, the AirPort wakes the Mac by some kind of WOL technology, maybe a simple magic packet. When the Mac comes out from sleep, it takes its IP back, thus generating a second, opposite entry in pfSense’s/FreeBSD’s system log.